- Company
- Community
- Resources
- Pricing
- ⚡Labeling service

For businesses and research teams that depend on precise image and video annotation, Computer Vision Annotation Tool (CVAT) offers a powerful solution to improve team productivity and accuracy. One of the standout features of CVAT.ai is the Organization feature, designed specifically for teamwork.
Here’s a practical guide on how to use Organizations for image annotations, structured around a common use-case scenario.
Background
Imagine you are responsible for a data annotation project that requires organizing and labeling large volumes of images or videos. You have a team ready to do the work, and your goal is to ensure that everyone operates efficiently and cohesively to deliver high-quality results. To help achieve this, you've chosen CVAT.ai as your preferred tool.
Or you are a student leading a research project, working with your peers on a similar task of data annotation. This project involves organizing and labeling images or videos for academic research purposes. Your main objective is to make sure that your classmates understand the tasks clearly, ensuring that everyone is on the same page, which will allow you to annotate the dataset effectively and proceed with your research. For this, CVAT.ai is your tool of choice.
This article will guide you through using CVAT.ai effectively with your team to ensure the best possible results. From setting up your project to managing tasks and collaborating. Whether you're annotating data for commercial use or an academic study, these guidelines will help you and your team succeed in your efforts.
Step 1: Setting Up Your Organization in CVAT.ai
Setting up CVAT.ai for optimal team collaboration involves a number of necessary steps: from registering in CVAT.ai to subscribing to the Team plan. Below is a guide outlining each action you need to take for a successful start:
1. Create an Account and Log In: Begin by going to the CVAT.ai website and creating an account. Once you've registered, log in with your credentials.
2. Create an Organization: In CVAT.ai, an Organization acts as a central hub where all projects, team members, and tasks can be managed under a single umbrella. Once logged in, create an Organization.
3. Switch to the Organization Account: After creating your Organization, switch from your individual account to your newly created organization account. Switching to the Organization account is mandatory for the next step, where you need to subscribe to a Team plan if you want to collaborate and annotate without any limits.
4. Subscribe to the Team Plan: To lift all the limitations of the Free plan and start working on the project with your team you need to subscribe. Before subscribing, check if you need to add any additional information to your invoices. Also, note that you, as an organization owner, are also part of the team. So, if you have three annotators working, you’ll need to pay for 4 seats (3 annotators + 1 organization owner (you!)).
Now all done and you are ready to invite team members and start working on the project. Let’s move on to the next step and invite team members for collaboration.
Step 2: Adding Team Members
Once your organization within CVAT.ai is established, the next step is to add your team members, ensuring that each participant has the appropriate access and tools needed to annotate. Here’s how to manage this process smoothly:
1. Invite members: Go to Organization > Settings you will see an Organization page with list of members and an Invite member button. Click on it to proceed. A dialogue box will appear where you can enter the email addresses of the people you want to add—these could be your annotators, reviewers, and any supervisory staff.
2. Assigning Roles and Responsibilities: As you invite each member, you’ll have the option to assign specific roles. Assigning roles is crucial for establishing a clear hierarchy and division of responsibilities within the team. Depending on their role, users will have access only to the functionalities necessary to perform their specific tasks.
Once you’ve added members and assigned roles, you can create project add tasks and assign jobs to annotators.
Step 3: Creating a Project and Uploading Data
Once your organization in CVAT is up and running and team members have accepted invitations to join, you'll need to create projects, add tasks, and assign jobs to the annotators. Here's how you can proceed:
1. Creating Projects: In CVAT.ai, projects serve as broad categories that organize related tasks under a specific theme or goal. Any labels or specifications added at the project level will automatically apply to all tasks and jobs within that project, ensuring consistency and saving time.
To create a project, go to the Projects section within your organization’s dashboard, and click + to create a new Project.. You'll be prompted to enter your project details such as the project name, description, and so on.
2. Adding Tasks to Projects: Tasks are the specific assignments that annotators work on within a project. Each task involves annotating a particular set of images or videos according to predefined guidelines and objectives.
To add a task to a project in CVAT.ai, first navigate to the project page. Then, click on + > Create a new task. Have your dataset ready, as you will need to upload it for the task to be successfully created.
When you create a task, CVAT.ai automatically generates jobs within that task. You can divide a single task into several jobs, allowing multiple annotators to work on different parts of the task simultaneously.
3. Specifications for Annotators: Clear specifications with guidelines for annotators help maintain consistency across annotations, which is crucial for training machine learning models. They also ensure that all team members are aligned with the project's standards, which helps in achieving high-quality outputs. You can easily create specifications within CVAT and add them at the Project or Task level, so all annotators can be on the same page.
4. Quality Assurance and QA: In CVAT.ai, you can ensure the quality of annotations through two methods: by creating a specific job known as a Honeypot for automatic QA, or by assigning a dedicated worker for manual QA. If you opt for the Honeypot, it's important to create this job before beginning the annotation process.
Step 4: Assigning Jobs/Tasks to Annotators and Annotation.
Once tasks are created and specifications set, assign them to individual annotators or, on the later stage, to reviewers. To do this, click on the Task you will see a list of jobs, all of them having an assignee field.
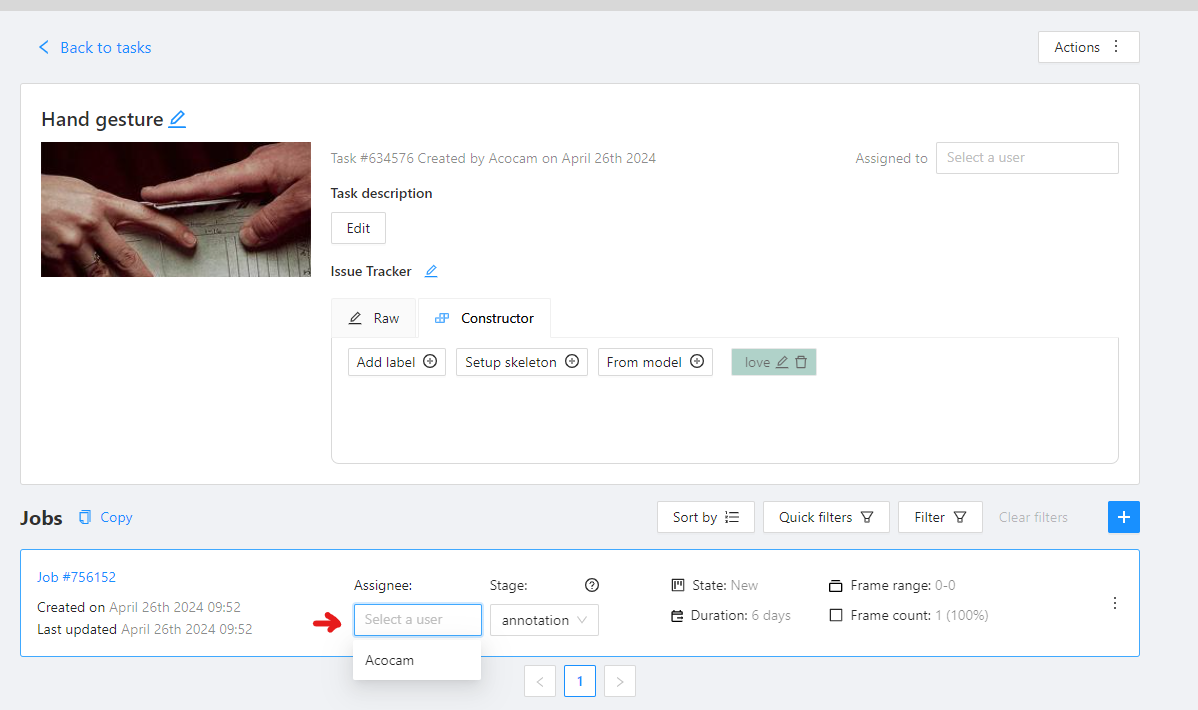
Click on it and select the name of the annotators and the Job’s stage.
And with that, you're all set!
Step 5: Configure Webhooks
This step is optional, but we recommend setting up webhooks for a seamless workflow.
Webhooks are a powerful tool within CVAT that allow for real-time notifications and automated reactions to specific events within the platform. By configuring webhooks, you can set up CVAT to send instant alerts or perform automated tasks whenever certain actions occur within your projects.
Step 6: Annotation
After you assign the jobs, annotators will see them and proceed with the annotation of the images or videos. This step is critical as it involves the direct application of data labeling based on the project guidelines.
Note, that after annotation is done, annotators need to save the work and change the job state to completed.
Step 7: Quality Assurance and Issue Resolution
After annotations are completed, it is essential to verify the quality of the work before acceptance. In CVAT.ai, you can do this in two ways: with automatic or manual quality assurance options.
1. Honeypot for Automatic QA: If you have set up a Honeypot (also known as the Ground Truth job), allow some time for the CVAT platform to accumulate data. This setup helps in checking the accuracy and quality of the annotations made by comparing them with pre-validated 'ground truth' data.
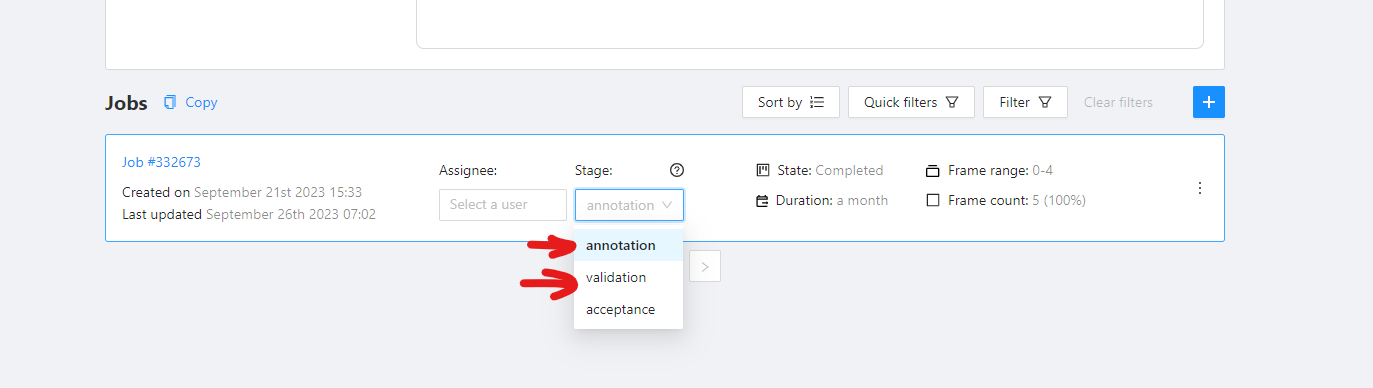
2. Assign Jobs to Validators for Manual Validation: You can manually validate annotations by assigning jobs to validators. Input the validator’s name in the 'Assignee' field and change the 'Job stage' to 'Validation'.
Validators will review the assigned jobs and report any issues found. In CVAT.ai validators can easily report any discrepancies or errors in the annotations.
Once all reports are available, the annotators can review and address any identified issues.
3. Correction of Issues: Review the issues reported by validators. If there is a need for further improvements, reassign the jobs to either the original annotator. Once annotators receive the reports, they can review and address any identified issues. Validators may also correct issues directly. This dual role of validating and correcting improves the quality control process, ensuring more accurate outcomes in the annotation project. However, the best process ultimately depends on your preference.
Step 8: Analytics and Performance
What follows is the annotating and quality assurance process. To streamline these stages, CVAT.ai offers analytics tools that help monitor the progress and performance of your team. These analytics provide valuable insights into task completion rates, annotator performance, and can highlight areas that may require additional attention or adjustment.
Step 9: Export Data
Once the annotation and validation stages are complete, and all quality checks are satisfied, export the annotated data. This data is now ready for use in machine learning models or for any other required purpose.
Conclusion
CVAT.ai Organizations were designed for team collaboration on annotation projects, making it easier to handle complex tasks. By using described steps, businesses can improve the data annotation processes, which in turn helps speed up the development of dependable and effective machine learning models.
Not a CVAT.ai user? Click through and sign up here
Do not want to miss updates and news? Have any questions? Join our community: