


Object detection is a field within Computer Vision that involves identifying and locating objects within an image. Advances in object detection algorithms have made it possible to detect objects in real-time as they are moving.
There are a number of Object detection technologies available. One of the most popular ones to date is the YOLO object detector.
Currently, YOLO is almost the gold standard algorithm for Object detection, owing to its high speed. As such, it finds widespread applications in a number of crucial areas like security and surveillance, traffic management, autonomous vehicles, as well as healthcare.
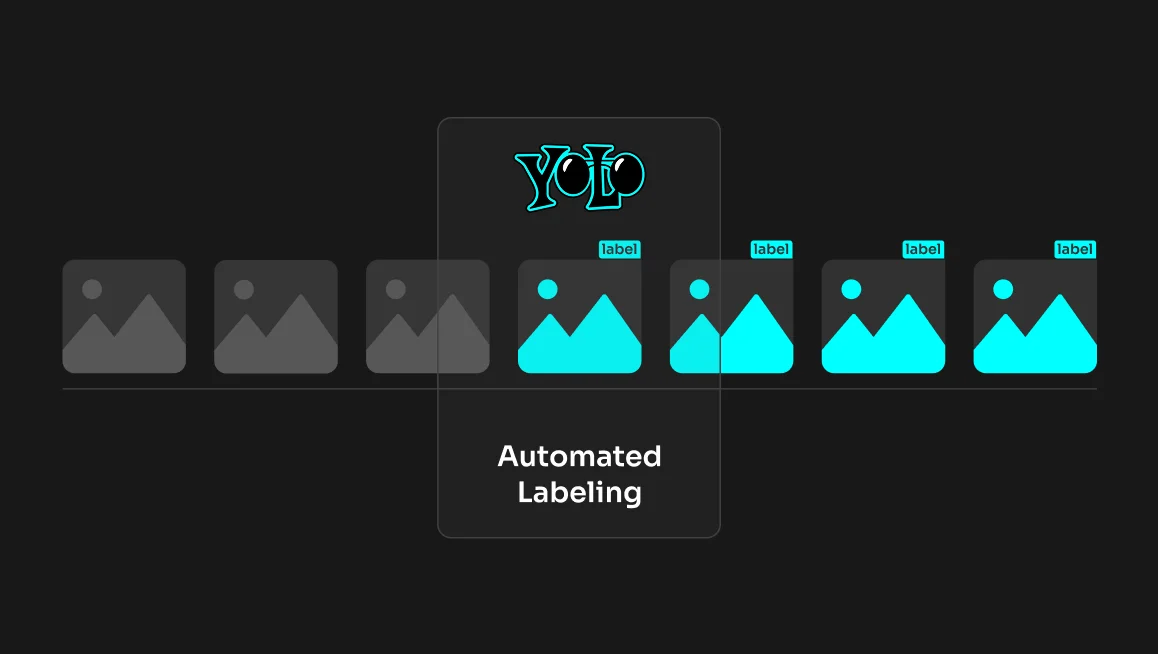
In this article, we will learn how YOLO works and how you can use it to annotate images in CVAT automatically.
A brief history of YOLO
Early object detectors were mainly region-based. They used a 2-step process to detect objects. In the first step, these algorithms proposed regions of interest that are likely to contain objects. In the second step, they classified the images in these proposed regions.
Some of the popular region-based algorithms include:
- R-CNN
- Fast R-CNN
- Faster R-CNN
- RFCN
- Mask R-CNN
Region-based detectors
R-CNN (Regions with CNN features) was the first region-based object detector, proposed in the year 2014. This detector used a process of selective search to cluster similar pixels into regions and generate a set of region proposals. These regions were then fed into a Convolutional Neural Network (CNN) to generate a feature vector. The feature vector was then used to classify and put a bounding box around detected objects. Besides other limitations, this algorithm proved to be quite time-intensive.
So, it was succeeded by the Fast R-CNN detector, which put the whole image through a CNN and used ROI pooling to extract the region proposals. The feature vectors thus generated were passed through several fully connected layers for classification and bounding box regression. Although this was faster than R-CNN, it was still not fast enough, as it still required selective search.
The Faster R-CNN detector drastically speeded up the detection process by getting rid of the selective search approach and using a Region Proposal Network instead. This network used an ‘objectness score’ to produce a set of object proposals. The objectness score indicates how confident the network is that a given region contains an object.
Another approach used was the R-FCN detector, which used position-sensitive score maps.
All the above methods required 2 steps to detect objects in an image:
- Detect the object regions
- Classify the objects in those regions
This 2-step process made the object detection process quite slow. A more sophisticated approach was required if object detection was to be used in real-time applications.
Emergence of YOLO
The YOLO algorithm was first proposed by Joseph Redmond et al in 2015. In contrast to earlier Object Detection algorithms, YOLO does not use regions to find objects in a given image. Neither does it require multiple iterations over the same image.
It passes the entire image through a Convolutional Neural Network that simultaneously locates and classifies objects in one go. That is how the algorithm gets its name (You Only Look Once).
This approach enables the algorithm to achieve substantially better results than other object detection algorithms.
How YOLO works
The YOLO algorithm divides the image into an NxN grid of cells (typically it is 19X19). It then finds B bounding boxes in each cell of the grid.
For each bounding box, the algorithm finds 3 things:
- The probability that it contains an object
- The offset values for the bounding box corresponding to that object
- The most likely class of the object
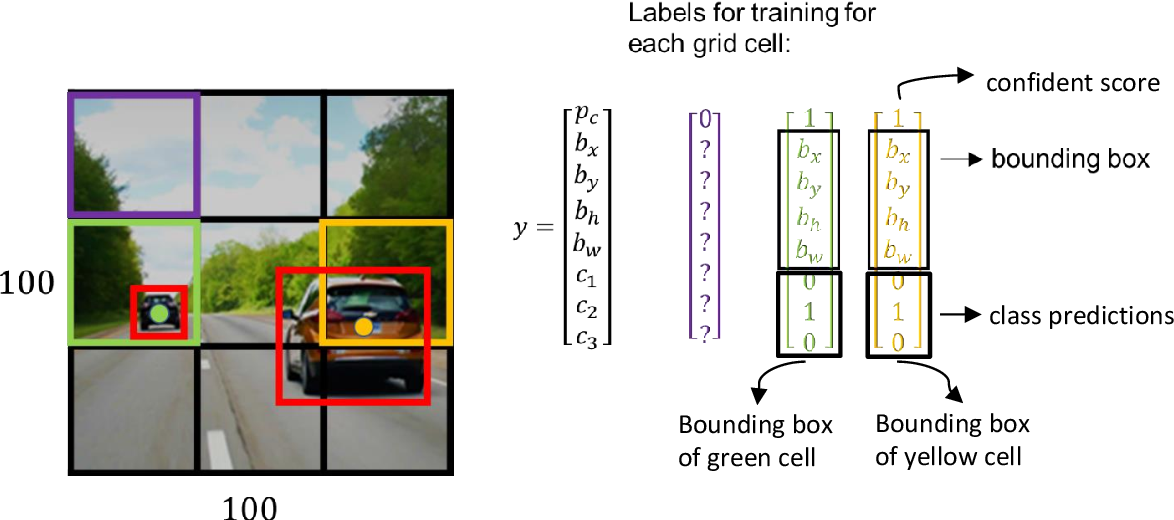
After this, the algorithm selects only the bounding boxes that most certainly contain an object.
IoU (Intersection Over Union)
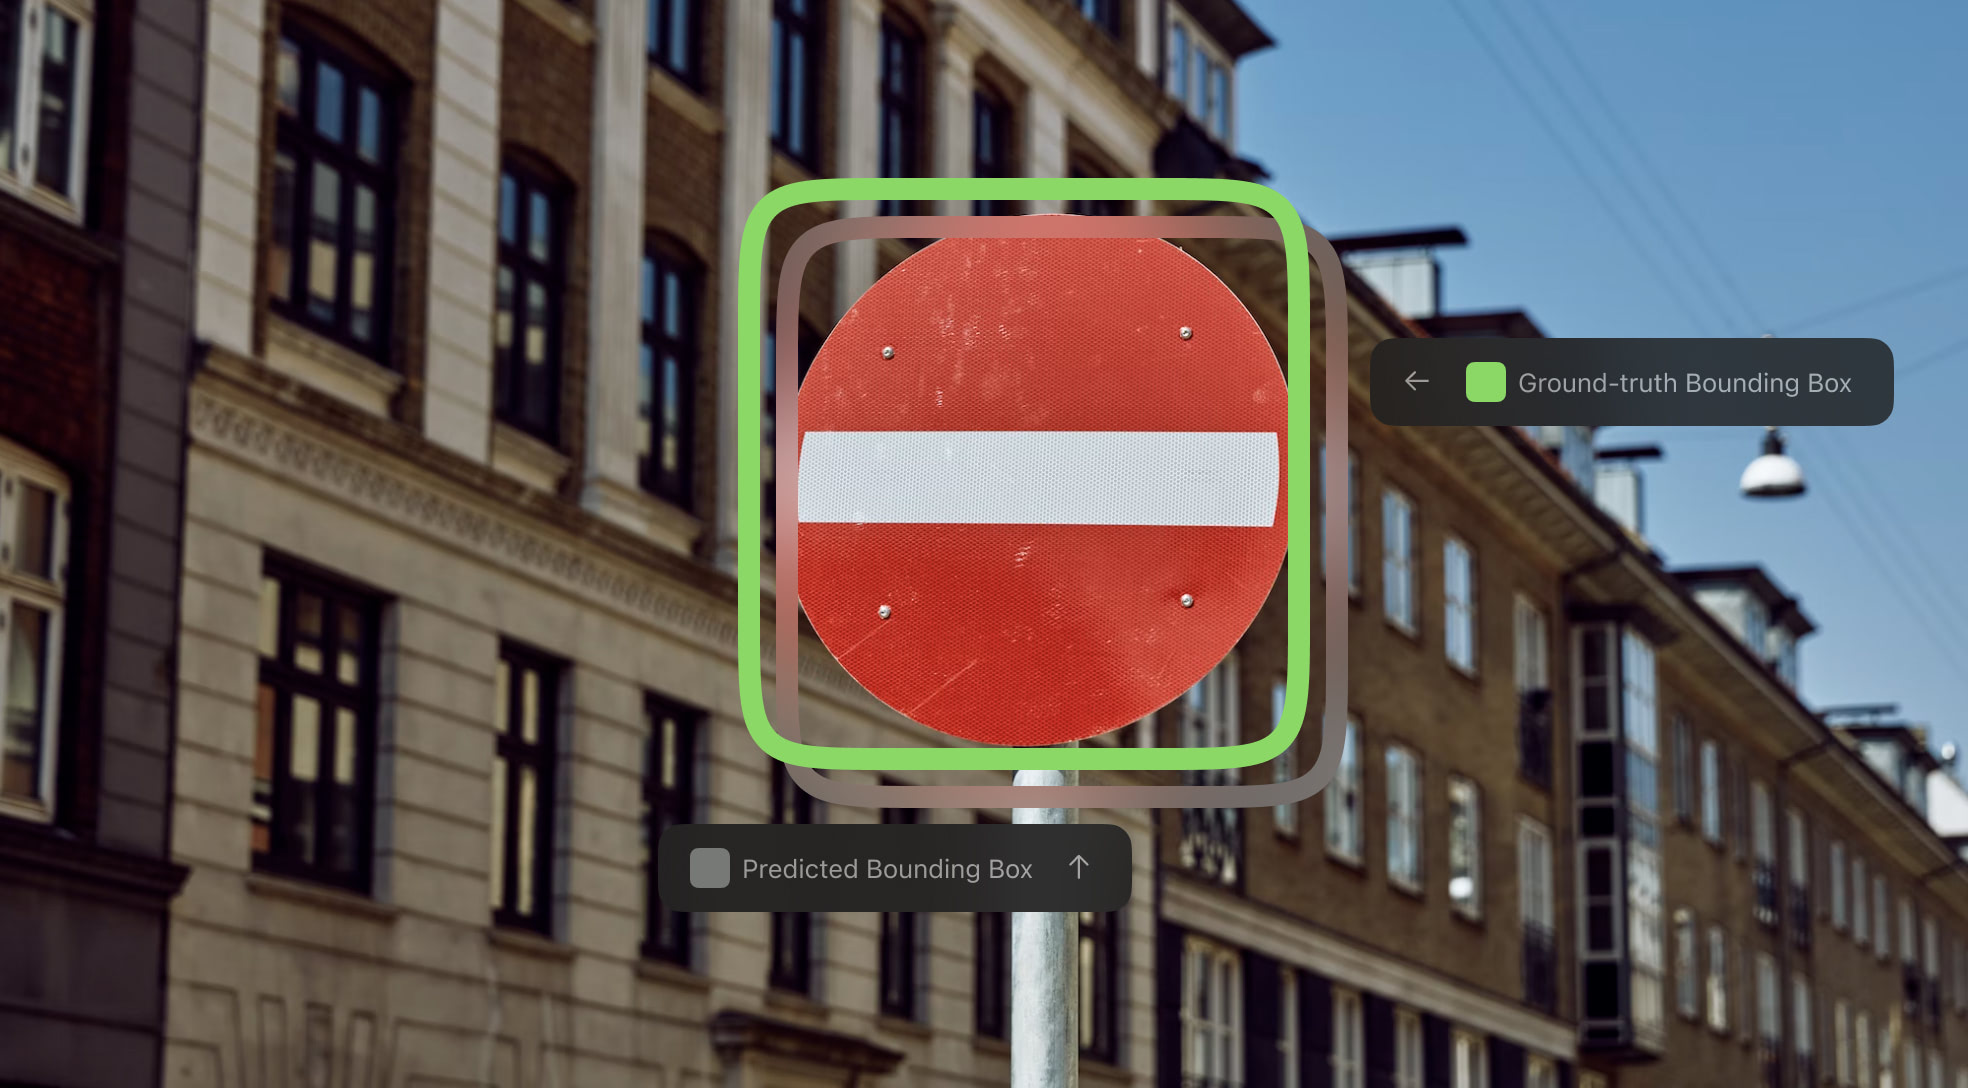
The YOLO algorithm uses a measure called the IoU to determine how close the detected bounding box is to the actual one.
The IoU is a measure of the overlap between two bounding boxes. During training, the YOLO algorithm computes the IoU between the bounding box predicted by the network and the ground truth (the bounding box that was pre-labeled for training).
It is calculated as follows:
IoU = area of intersection of the overlapping boxes / area of union of all the overlapping boxes
An IoU of 1 means that both bounding boxes completely overlap one another, whereas an IoU of 0 means that the two bounding boxes are completely distinct. A threshold for the IoU is fixed, and only those bounding boxes that have an IoU above the threshold value are retained, while others are ignored. This helps eliminate a lot of unnecessary bounding boxes so that you’re left with only the ones that best fit the object.
Non-Maximum Suppression
During the testing phase, since there are a number of cells detecting the same object, it is possible to be left with several bounding boxes corresponding to the same object. YOLO takes care of this by using a technique called Non-maximum suppression.
Non-max suppression involves first selecting the bounding box with the highest probability score and removing (suppressing) all other boxes that have a high overlap with this box. This again makes use of the IoU, this time between all the candidate bounding boxes and the one with the highest probability score.
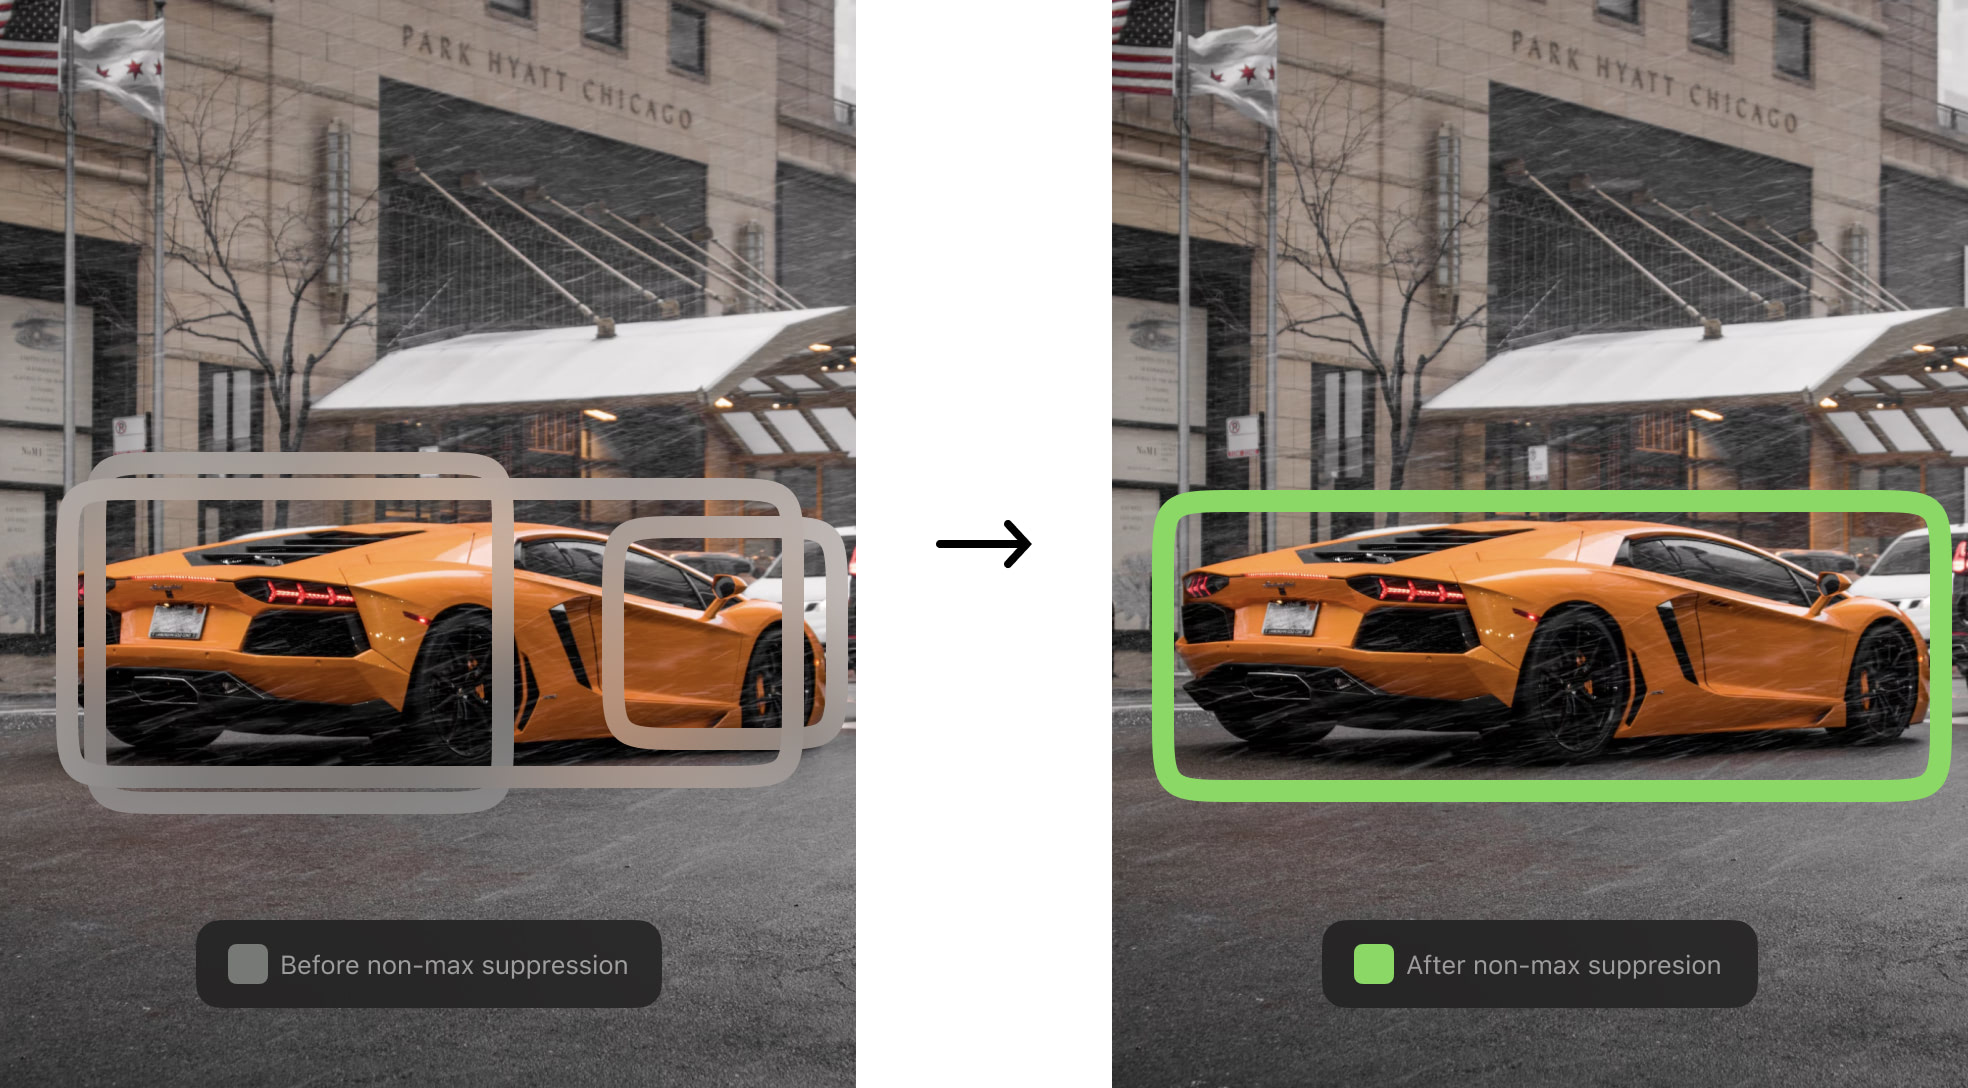
Bounding boxes that have a high IoU with the most probable bounding box are considered to be redundant and are thus removed. However, those with a low IoU are considered to perhaps belong to a different object of the same class and are thus retained.
In this way, the YOLO algorithm selects the most appropriate bounding box for an object.
YOLO Architecture
YOLO is essentially a CNN (Convolutional Neural Network). The YOLOv1 network consists of 24 convolutional layers, and 4 max-pooling layers, followed by 2 fully connected layers. The model resizes the input image to 448x488 before passing it through the CNN.
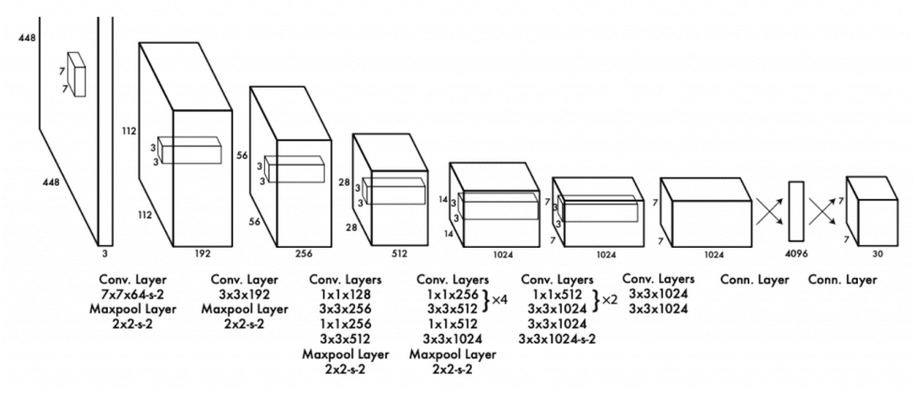
The convolutional layers in the network alternate 1x1, followed by 3x3 reduction layers to reduce the feature space as the image goes deeper into the network.
The last convolutional layer uses a linear activation function, while all others use leaky ReLU for activation.
Limitations of YOLO
The YOLO algorithm has been a great leap in the field of object detection. Since it can process frames much faster than traditional object detection systems, it is ideal for real-time object detection and tracking. However, it does come with some limitations.
The YOLO model struggles when there are small objects in the image. It also struggles when the objects are too close to one another. For example, if you have an image of a flock of birds, the model would not be able to detect them very accurately.
Popular YOLO versions
To overcome the limitations of YOLOv1, many new versions of the algorithm have been introduced over the years.
The YOLOv2 was introduced in 2016 by the same author (Joseph Redmond). It addressed the most important limitations of YOLOv1 - the localization accuracy and the detection of small clustered objects. The new model allowed the prediction of multiple bounding boxes (anchor boxes) per grid cell, so more than one object could now be detected in a single cell. Moreover, to improve accuracy the model used Batch Normalization in the convolutional layers.
YOLOv2 uses the Darknet-19 network, which consists of a total of 19 convolutional layers and 5 max-pooling layers.
Following YOLOv2, the YOLO9000 was introduced. This model was trained on the COCO dataset (which is almost a superset of ImageNet), allowing it to detect more than 9000 image classes.
When YOLOv3 came about, it brought with it an architectural novelty that made up for the limitations of both YOLO and YOLOv2. So much so that it is still the most popular of the YOLO versions to date. This model uses a much more complex network – the Darknet-53. It gets its name from the 53 convolutional layers that make up its architecture. The model itself consists of 106 layers, with feature maps extracted at 3 different layers. In this way, it allows the network to predict at 3 different scales. This means that the network is especially great at detecting smaller objects.
Besides that, YOLOv3 uses logistic classifiers for each class, instead of a softmax function (used in the previous YOLO models). This allows the model to label multiple classes for a single object. For example, an object could be labeled as both a ‘man’ as well as a ‘person’.
After YOLOv3, other authors introduced newer versions of YOLO. For example, Alexey Bochkovskiy introduced the YOLOv4 in 2020. This new version mainly increased the speed and accuracy of the model with new technologies like weighted residual connections, cross mini batch normalization, and more.
Many other versions have come about following the YOLOv4, like the YOLOv5, YOLOACT, PP-YOLO, and more. The latest version to date is the YOLOv7. The paper for this model was released in July 2022 and is already quite popular.
According to the authors, the YOLOv7 could outperform most conventional object detectors, including YOLOR, YOLOX, and YOLOv5. In fact, the YOLOv7 is being hailed by its authors as the ‘New State-of-the-Art for Real-Time Object Detectors’.
How you can use YOLO in CVAT
To train any object detection model on image data, you need pre-annotated images (containing labeled bounding boxes). There are a number of tools available both online and offline to help you do this. One such tool is CVAT (Computer Vision Annotation Tool).
This is a free, open-source online tool that helps you label image data for computer vision algorithms. Using this tool, you can simply annotate your images and videos right from your browser.
Here’s a quick tutorial on how to annotate objects in your image using CVAT.
Using YOLO to Annotate Images
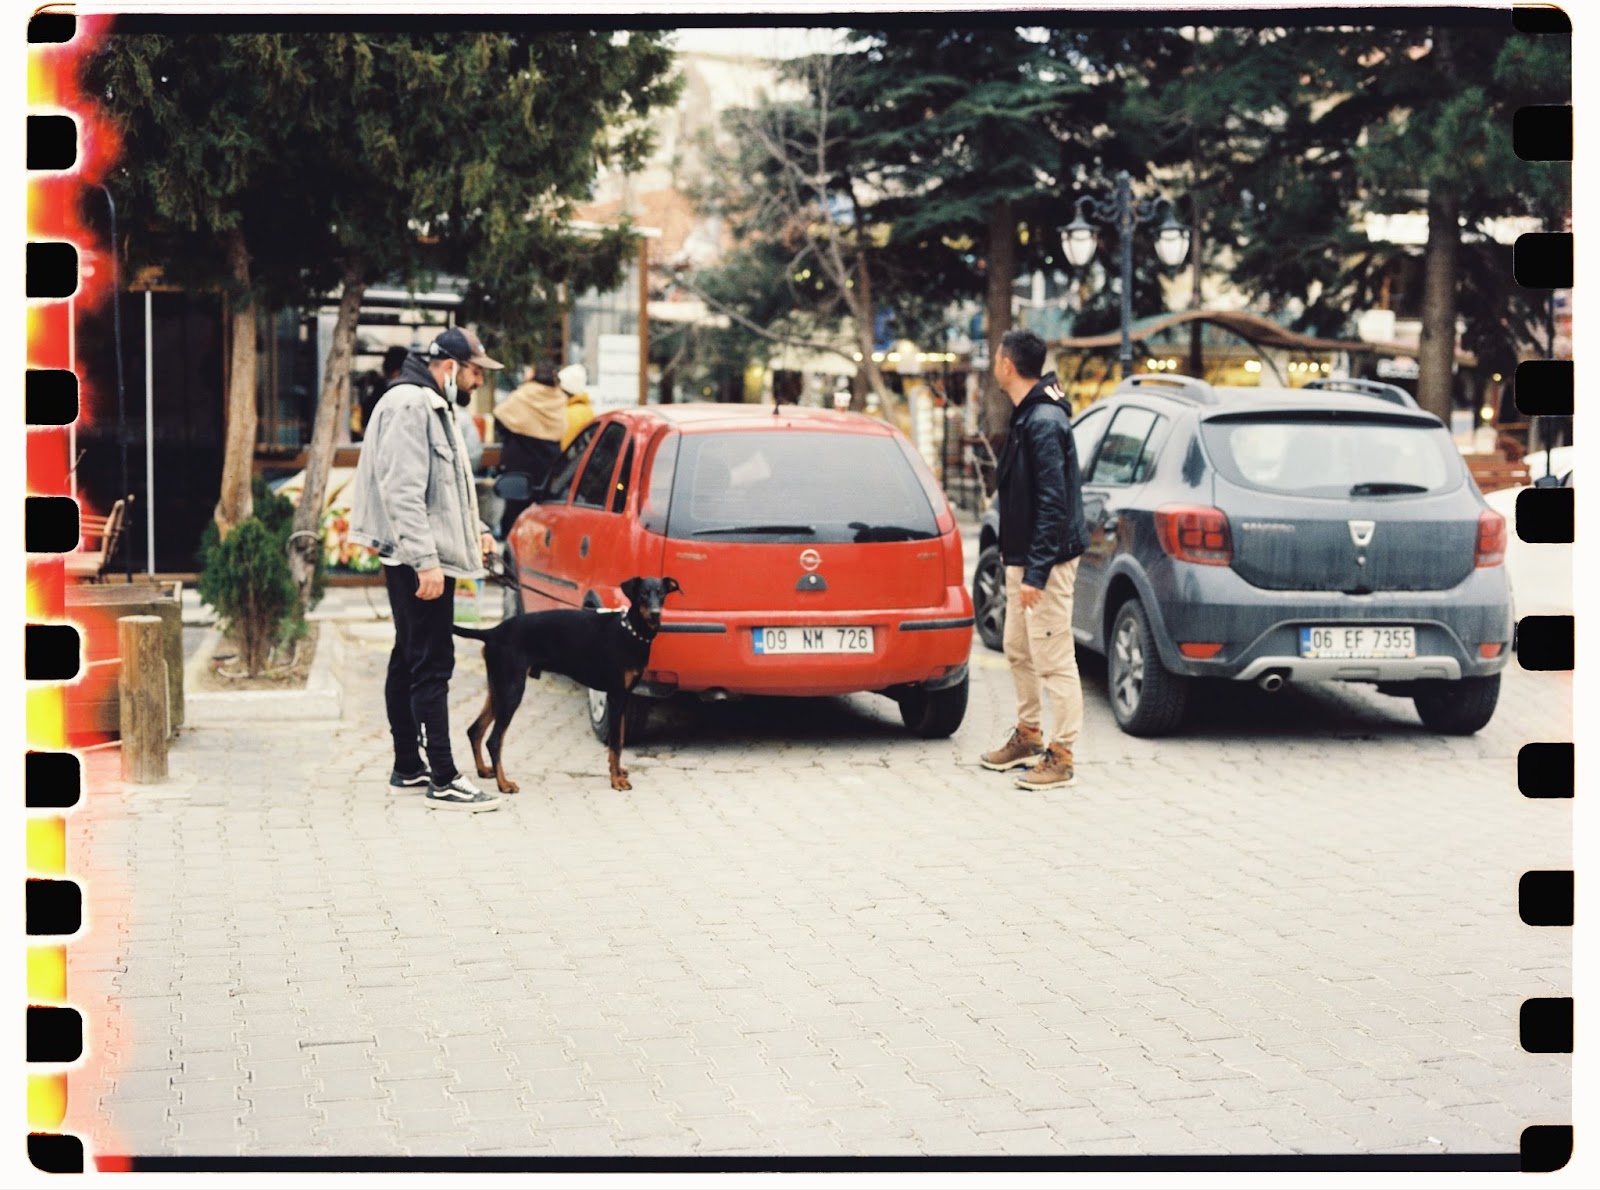
Let’s say you have the following image and you want to put bounding boxes and labels on the two cars, dog, and pedestrians.
To do it, you need to go to cvat.ai, create an account and upload an image.
When it comes to image uploading, the whole process includes several steps. First step is to set up a project and add task with the labels of choice (in this case: ‘pedestrian‘, ‘dog‘, and ‘car‘).
Second step is to upload one or more images you want to annotate and click ‘Submit and Open‘.
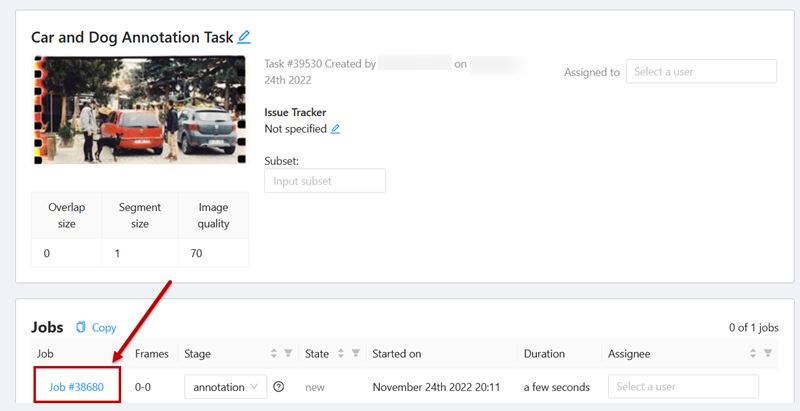
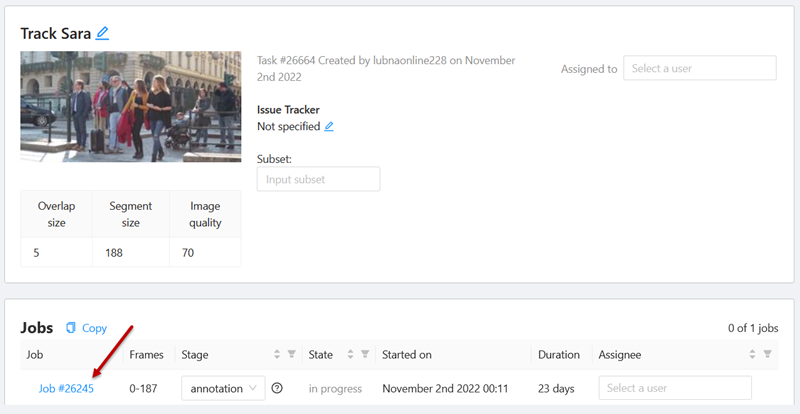
Once everything is in place, you will see your task and all the details as a new job (with a new job number).
The window below is the ‘Task dashboard’. Click on the job number link:
It will take you to the annotation interface:
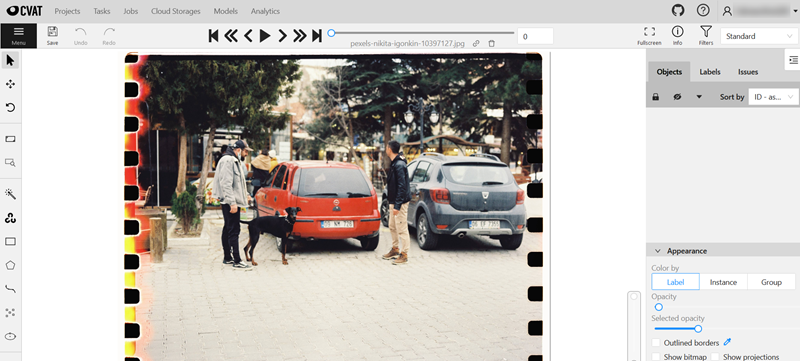
Now you can start annotating.
How to Manually Annotate Objects in an Image
In this example we show annotations with rectangles. To add a rectangular bounding box manually, you need to select a proper tool on the controls sidebar. Hover over the ‘Draw new Rectangle’, and from the drop-down list select the label you want to add to the annotated object. Click `Shape`.
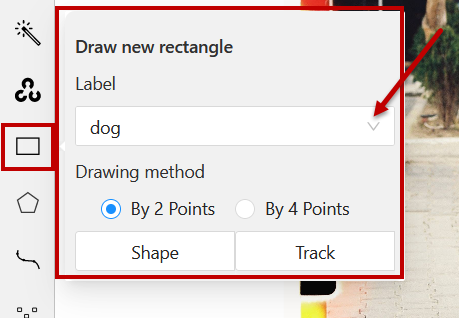
With a rectangle, you can annotate using either 2 or 4 points. Let’s say, you chose 2 points, then simply click on the top left corner and then the bottom right corner of the object, like this:
CVAT will put the bounding boxes with specified labels around the objects.
This method is good when you do not have too many objects on the image. But if you have a lot of them, then the manual method can get quite tedious. For multiple objects cases CVAT has a more efficient tool to get the job done – the YOLO object detection.
Using YOLO to Quickly Annotate Images in CVAT
CVAT incorporates YOLO object detection as a quick annotation tool. You can automate the annotation process by using the YOLO model instead of manually labeling each object.
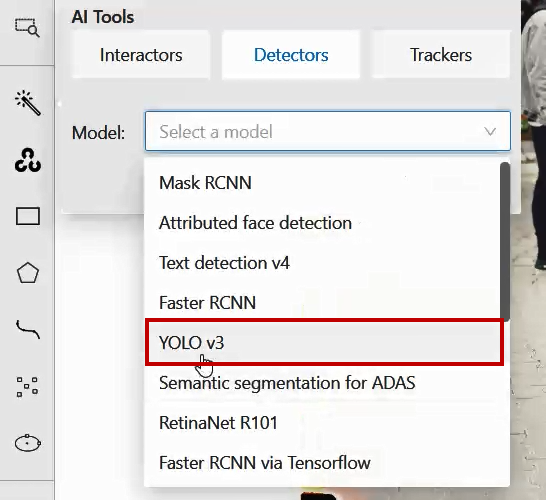
Currently, two YOLO versions are available in CVAT: YOLO v3 and YOLO v5. In this example, we will use YOLO v3. To use the YOLO v3 object detector, on the controls sidebar hover over the AI Tools and go to Detectors tab. You will see a menu with a drop-down list of available models. From this drop-down, select ‘YOLO v3’.
The next thing you need to do is the labels’ matching. This need is based on the fact that some models are trained on the datasets with a predefined list of labels. ‘YOLO v3’ is a model like that and to start annotating you need to give YOLO a hint - how its model’s labels are correlating with the ones you’ve added to CVAT.
For example, you want to label all people on the image and added a ‘pedestrian’ label in CVAT. The most fitting YOLO label for this type of object will be ‘person’. To start annotating, you need to match the YOLO label ‘person’ to the CVAT label ‘pedestrian’ in the Detectors menu.
Luckily, for other objects there is no need to think twice, as YOLO has `dog` and `car` model labels:
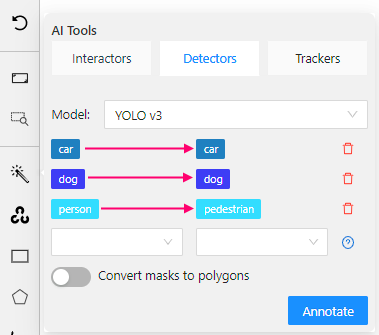
Once you’re done matching the labels, click ‘Annotate’. CVAT will use YOLO to annotate all the objects for which you have specified labels.
After annotation is done, go ahead and save your task by clicking the Save button, or export your annotations in the .xml format from Menu > Export Job Dataset.
Quickly Annotating Objects in Videos
You can use CVAT Automatic Annotation with YOLO detector to label objects in videos directly from your Task Dashboard with a few simple steps.
First step is to find the task of the required video. Once you’ve identified it, hover over three dots to open the pop up menu.

In the menu click on Automatic Annotation to open the dialog box, and from the drop down menu select ‘YOLO v3’ .
Second step is to check the labels matching, and adjust them to fit your needs and requirements (if needed).
When all is set and ready, click ‘Annotate’ to start labeling objects in the video.
It will take some time for automatic annotation to complete. The progress bar will show the status of the process.

When it is done, you will see a notification box along with a link to the task.
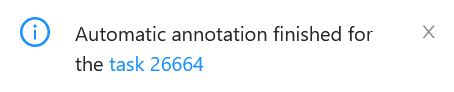
Click on the link to open the task dashboard, and again on the job link to open the annotation interface.
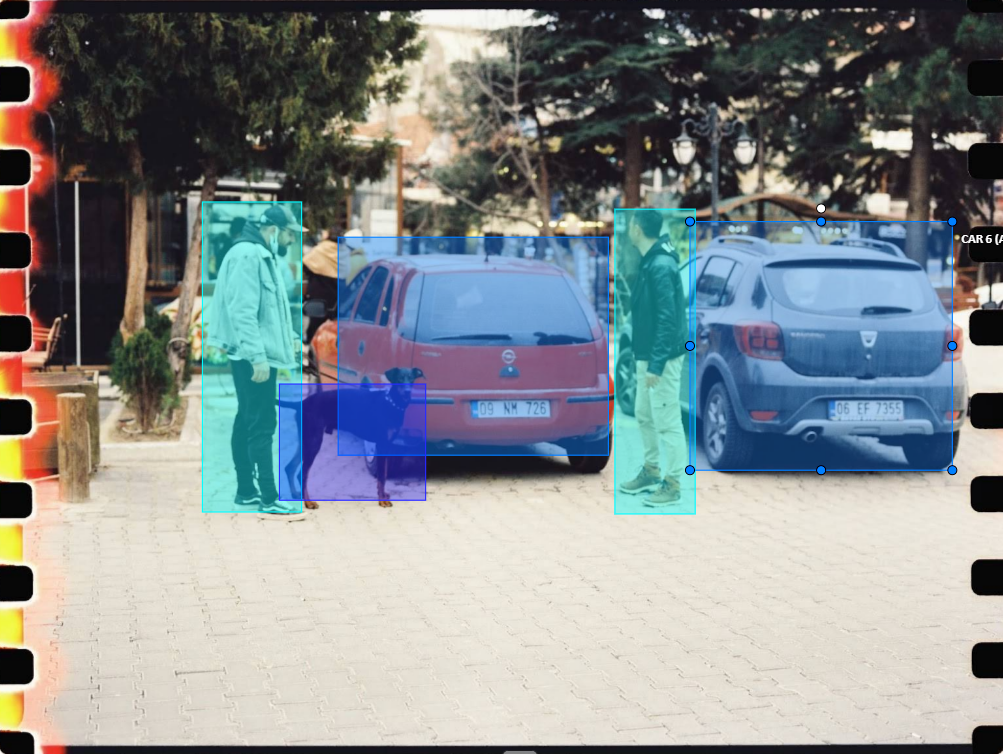
Where you will see the video with objects automatically labeled in every frame:
You can now go ahead and edit the annotations as needed if you find any false positives or negatives.
Conclusion
YOLO is a specialized Convolutional Neural Network that detects objects in images and videos. It gets its name (You Only Look Once) from its technique of localizing and classifying objects in an image in just one forward pass over the network.
The YOLO algorithm presented a major improvement over the previous 2-stage object detection algorithms like R-CNN and Faster R-CNN in the inference speed. In an attempt to increase the speed and accuracy of object detection, numerous versions of YOLO have been introduced over the years. The latest version is the YOLOv7.
Using YOLO on the CVAT platform, you can annotate images and videos within minutes, significantly reducing the amount of manual work that image annotations usually call for.
We hope this tutorial helped you understand the concept and architecture of YOLO, and that you can now use it to detect and annotate objects in your own image data.


.svg)
.png)

.png)


.png)