SAM2 Object Tracking Comes to CVAT Online Through AI Agent Integration
Previously on this blog, we described the use of the Segment Anything Model 2 (SAM2) for quickly annotating videos by tracking shapes from an initial frame. However, this feature was limited to self-hosted CVAT Enterprise deployments.
We have also covered using arbitrary AI models via agents and auto-annotation functions to annotate a CVAT task from scratch.
Today we’ll talk about a new CVAT feature that combines the benefits of the two approaches: tracking support in auto-annotation (AA) functions. This enables each user of CVAT Online to make use of an arbitrary tracking AI model by writing a small wrapper (AA function) around it, and running a worker process (AI agent) on their hardware to handle requests. In addition, we have implemented a ready-to-use AA function based on SAM2, so that users who want to make use of that particular model can skip the first step and just run an agent.
In this article we will explain how to use the SAM2-based AA function, as well as walk through some of the implementation details.
Quick start
Let’s get started. You will need:
Installed Python (3.10 or a later version) and Git.
An account at either CVAT Online or an instance of CVAT Enterprise version 2.42.0 or later.
First, clone the CVAT source repository into some directory on your machine. We’ll call this directory <CVAT_DIR>: git clone https://github.com/cvat-ai/cvat.git <CVAT_DIR> Next, install the Python packages for CVAT CLI, SAM2 and Hugging Face Hub: pip install cvat-cli -r <CVAT_DIR>/ai-models/tracker/sam2/requirements.txt If you have issues with installing SAM2, note that the SAM2 install instructions contain solutions to some common problems. Next, register the SAM2 function with CVAT and run an agent for it:
cvat-cli --server-host <CVAT_BASE_URL> --auth <USERNAME>:<PASSWORD> \ function create-native "SAM2" \ --function-file=<CVAT_DIR>/ai-models/tracker/sam2/func.py -p model_id=str:<MODEL_ID>
cvat-cli --server-host <CVAT_BASE_URL> --auth <USERNAME>:<PASSWORD> \ function run-agent <FUNCTION_ID> \ --function-file=<CVAT_DIR>/ai-models/tracker/sam2/func.py -p model_id=str:<MODEL_ID>
where:
<CVAT_BASE_URL> is the URL of the CVAT instance you want to use (such as https://app.cvat.ai).
<USERNAME> and <PASSWORD> are your CVAT credentials.
<FUNCTION_ID> is the number output by the function create-native command.
<MODEL_ID> is one of the SAM2 model IDs from Hugging Face Hub, such as facebook/sam2.1-hiera-tiny.
Optionally:
Add -p device=str:cuda to the second command to run the model on your NVIDIA GPU. By default, the model will run on the CPU.
Add --org <ORG_SLUG> to both commands to share the function with your organization. <ORG_SLUG> must be the short name of the organization; it is the name displayed under your username when you switch to the organization in the CVAT UI.
The last command should stay running, indicating that the agent is listening to annotation requests from the server.
This completes the setup steps. Now you can try the function in action:
Open the CVAT UI.
Create a new CVAT task or open an existing one. The task must be created either from a video file or from a video-like sequence of images (all images having the same dimensions).
Open one of the jobs from the task.
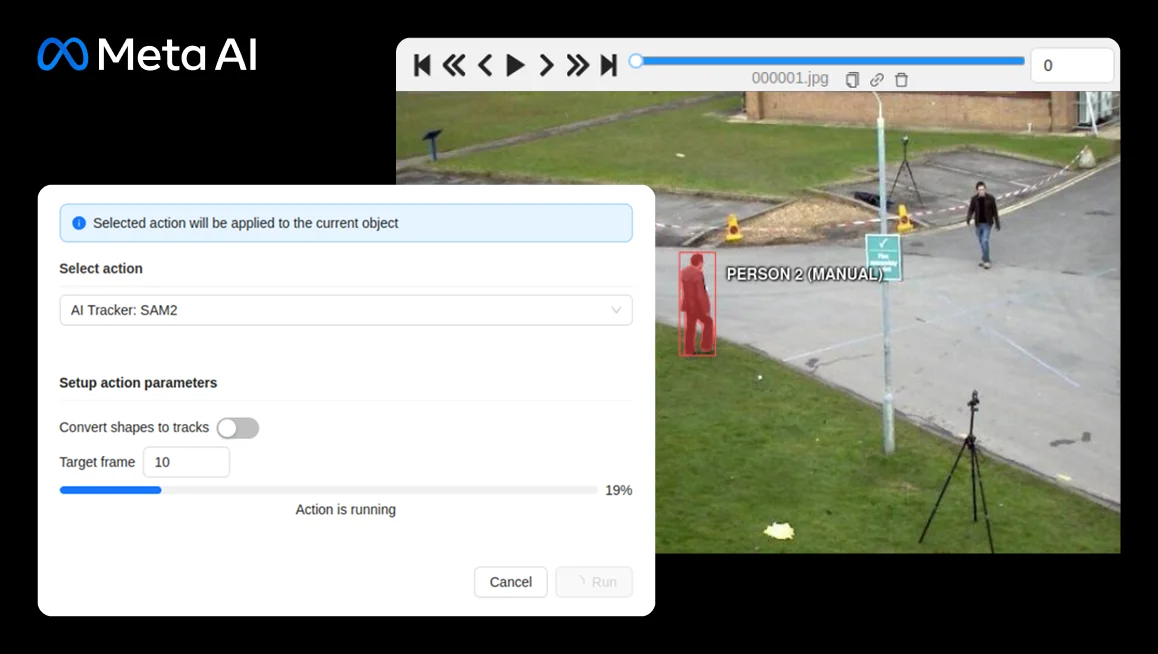
Draw a mask or polygon shape around an object. Right-click the shape, open the action menu and choose “Run annotation action”. Choose “AI Tracker: SAM2” in the window that appears. Enter the number of the last frame that you want to track the object to and press Run. Wait for the annotation process to complete. Examine the subsequent frames. You should now see a mask/polygon drawn around the same object on every frame up to the one you selected in the previous step. Instead of selecting an individual shape, you can also track every mask & polygon on the current frame by opening the menu in the top left corner and selecting “Run actions”.
Implementation
Now let’s take a peek behind the curtains and see how the SAM2 tracking function works. This will be useful if you need to troubleshoot, or if you want to implement a tracking function of your own. Unfortunately, the source of the module is too long to explain in its entirety in this article, but we’ll cover the overall structure and key implementation features.
First, let’s look at the top-level structure of func.py: @dataclasses.dataclass(frozen=True, kw_only=True)
class _PreprocessedImage: ... @dataclasses.dataclass(kw_only=True)
class _TrackingState: ... class _Sam2Tracker: ... create = _Sam2Tracker
Since we wanted to support multiple model variants, as well as multiple devices, with a single implementation, we did not place the function’s required attributes directly in the module. Instead, we put them inside a class, _Sam2Tracker, which we want to be instantiated by the CLI with the parameters passed via the -p option. To tell the CLI which class to instantiate, we alias the name create to our class.
There are also two auxiliary dataclasses, _PreprocessedImage and _TrackingState. These are not part of the tracking function interface, but an implementation detail. We will see their purpose later.
Let’s now zoom in on _Sam2Tracker.
__init__ and spec
Similar to detection functions that we’ve covered before, in the constructor we load the underlying model (SAM2VideoPredictor). We also create the PyTorch device object and create an input transform. def __init__(self, model_id: str, device: str = "cpu") -> None: self._device = torch.device(device) self._predictor = SAM2VideoPredictor.from_pretrained(model_id, device=self._device) self._transform = torchvision.transforms.Compose([...])
Also similar to detection functions, our tracker must define a spec, although it has to be of type TrackingFunctionSpec: spec = cvataa.TrackingFunctionSpec(supported_shape_types=["mask", "polygon"])
In a tracking function, the spec describes which shape types the function is able to track.
However, the other attributes of _Sam2Tracker are entirely unlike those of detection functions.
On a high level, a tracking function must analyze an image with a shape on it, then predict the location of that shape on other images. However, to allow more efficient tracking of multiple shapes per image, as well as to enable interactive usage, this functionality is split across three methods.
preprocess_image def preprocess_image( self, context: cvataa.TrackingFunctionContext, image: PIL.Image.Image ) -> _PreprocessedImage: image = image.convert("RGB") image_tensor = self._transform(image).unsqueeze(0).to(device=self._device) backbone_out = self._predictor.forward_image(image_tensor) ... return _PreprocessedImage( original_width=image.width, original_height=image.height, vision_feats=...(... backbone_out...), ..., )
This method is supposed to perform any processing that the function can do without knowing the details of the shape it’s tracking. In this way, the results can be reused for multiple shapes. In our case, the underlying model has a dedicated method for doing this, so we transform our input image, and pass it to this method. We then return all information we’ll need later as a new instance of our class _PreprocessedImage. The agent does not care what type of object is returned by preprocess_image - it just saves that object so it can pass it to the other methods.
Speaking of which…
init_tracking_state def init_tracking_state( self, context: cvataa.TrackingFunctionShapeContext, pp_image: _PreprocessedImage, shape: cvataa.TrackableShape, ) -> _TrackingState: mask = torch.from_numpy(self._shape_to_mask(pp_image, shape)) resized_mask = ...(... mask ...) current_out = self._call_predictor(pp_image=pp_image, mask_inputs=resized_mask, ...) return _TrackingState( frame_idx=0, predictor_outputs={"cond_frame_outputs": {0: current_out}, ...}, ) def _call_predictor(self, *, pp_image: _PreprocessedImage, frame_idx: int, **kwargs) -> dict: out = self._predictor.track_step( current_vision_feats=pp_image.vision_feats, frame_idx=frame_idx, ... **kwargs, ) return ...(... out ...)
This method is supposed to analyze the shape on the initial frame. Here we convert the input shape to a mask tensor (for brevity we’ll omit the definition of _shape_to_mask here), and then pass it, alongside the preprocessed image, to the underlying model (via a small wrapping function). The method then encapsulates all information that will be needed to track the shape on subsequent frames in a new _TrackingState object and returns it.
Much like preprocess_image, the agent doesn’t care what type of object the method returns, so the tracking function can choose the type in order to best suit its own needs. The agent will simply pass this object into our final method…
track def track( self, context: cvataa.TrackingFunctionShapeContext, pp_image: _PreprocessedImage, state: _TrackingState ) -> cvataa.TrackableShape: state.frame_idx += 1 current_out = self._call_predictor( pp_image=pp_image, frame_idx=state.frame_idx, output_dict=state.predictor_outputs, ... ) non_cond_frame_outputs = state.predictor_outputs["non_cond_frame_outputs"] non_cond_frame_outputs[state.frame_idx] = current_out ... output_mask = ...(... current_out["pred_masks"] ...) if output_mask.any(): return self._mask_to_shape(context, output_mask.cpu()) else: return None
This method is supposed to locate the shape being tracked on another frame. Here we pass data from the state object and the preprocessed image to the model and get a mask back. If the mask has any pixels set, we return it as a TrackableShape object. The _mask_to_shape method (whose definition we’ll omit) will convert the mask to a shape of the same type as the original shape passed to init_tracking_state. If the mask is all zeros, we presume that we lost track of the shape, and return None.
The model also returns additional data that can be used to better track the shape on subsequent frames. track adds it to the tracking state, as can be seen with the non_cond_frame_outputs update. This way, future calls to track are able to make use of this data.
Agent behavior
Now that we’ve examined the purpose of each method, we can see how they all fit together by looking at the tracking process from the agent’s perspective.
Let’s say an agent has loaded tracking function F, and a user makes a request for shape S0 from image I0 to be tracked to images I1, I2, and I3. In this case, the agent will make the following calls to the tracking function:
STATE = F.init_tracking_state(SC, F.preprocess_image(C, I0), S0)
S1 = F.track(SC, F.preprocess_image(C, I1), STATE)
S2 = F.track(SC, F.preprocess_image(C, I2), STATE)
S3 = F.track(SC, F.preprocess_image(C, I3), STATE)
It will then return resulting shapes S1, S2, and S3 to CVAT.
Here C and SC are context objects, created by the agent. For more information on these, please refer to the reference documentation.
Limitations
There are a few things to keep in mind when using tracking functions (SAM2 included). First, agents currently keep the tracking states in their memory. This means that:
Only one agent can be run at a time for any given tracking function. If you run more than one agent for a function, users may see random failures as agents try to complete requests referencing some other agent’s tracking states.
If the agent crashes or is shut down, all tracking states are destroyed. If this happens while a user is tracking a shape, the process will fail.
Second, tracking functions can only be used via agents. There is no equivalent of the cvat-cli task auto-annotate command.
Third, tracking functions may be used either via an annotation action (as was shown in the quick start), or via the AI Tools dialog (accessible via the sidebar). However, the latter method only works with tracking functions that support rectangles - other functions will not be selectable.
Fourth, skeletons cannot currently be tracked.
Conclusion
Tracking with SAM2 saves significant time compared to manually annotating each frame. If you are a user of CVAT Online, this feature is now available to you - sign in and try it out!
If there is another model you’d like to use for tracking, you can likely do that as well, as long as you implement the corresponding auto-annotation function. For more details on that, refer to the reference documentation:
https://docs.cvat.ai/docs/api_sdk/sdk/auto-annotation/
https://docs.cvat.ai/docs/api_sdk/cli/#examples---functions
For more information on other capabilities of AA functions and AI agents, see our previous articles on the topic:
https://www.cvat.ai/resources/blog/an-introduction-to-automated-data-annotation-with-cvat-ai-cli
https://www.cvat.ai/resources/blog/announcing-cvat-ai-agents
https://www.cvat.ai/resources/blog/cvat-ai-agents-update
Product Updates
July 31, 2025
SAM2 Object Tracking Comes to CVAT Online Through AI Agent Integration

.svg)


.jpg)
.png)

.png)


