


The success of your AI project, whether you're developing precision agriculture systems to detect crop diseases, creating AI-powered tools for early lung cancer detection from CT scans, depends on one crucial element: high-quality annotated data.
However, high-quality labeled data does not happen by accident. It depends on many factors, including your annotators' expertise, the complexity of your data, your review process, the tools you use, and the guidelines your annotators must follow.
Many annotation guidelines appear comprehensive on paper. They define labels, describe object classes, and include examples. But once handed to a team of annotators, they can quickly fall apart, leading to inconsistent labels, endless edge-case debates, slow review cycles, and models that fail to generalize in production.
In this guide, based on dozens of labeling projects we've run at CVAT, we explain how to create annotation specifications that survive contact with real-world data, reduce inter-annotator disagreement, and produce ground truth data you can actually train on.
What Are Data Labeling Guidelines? And, Why Does Your Project Need Them?
Annotation guidelines — sometimes called labeling specifications — are the documentation that tells your annotation team how to label data. They are not a style preference or a nice-to-have, but are the single source of truth for every decision an annotator makes.
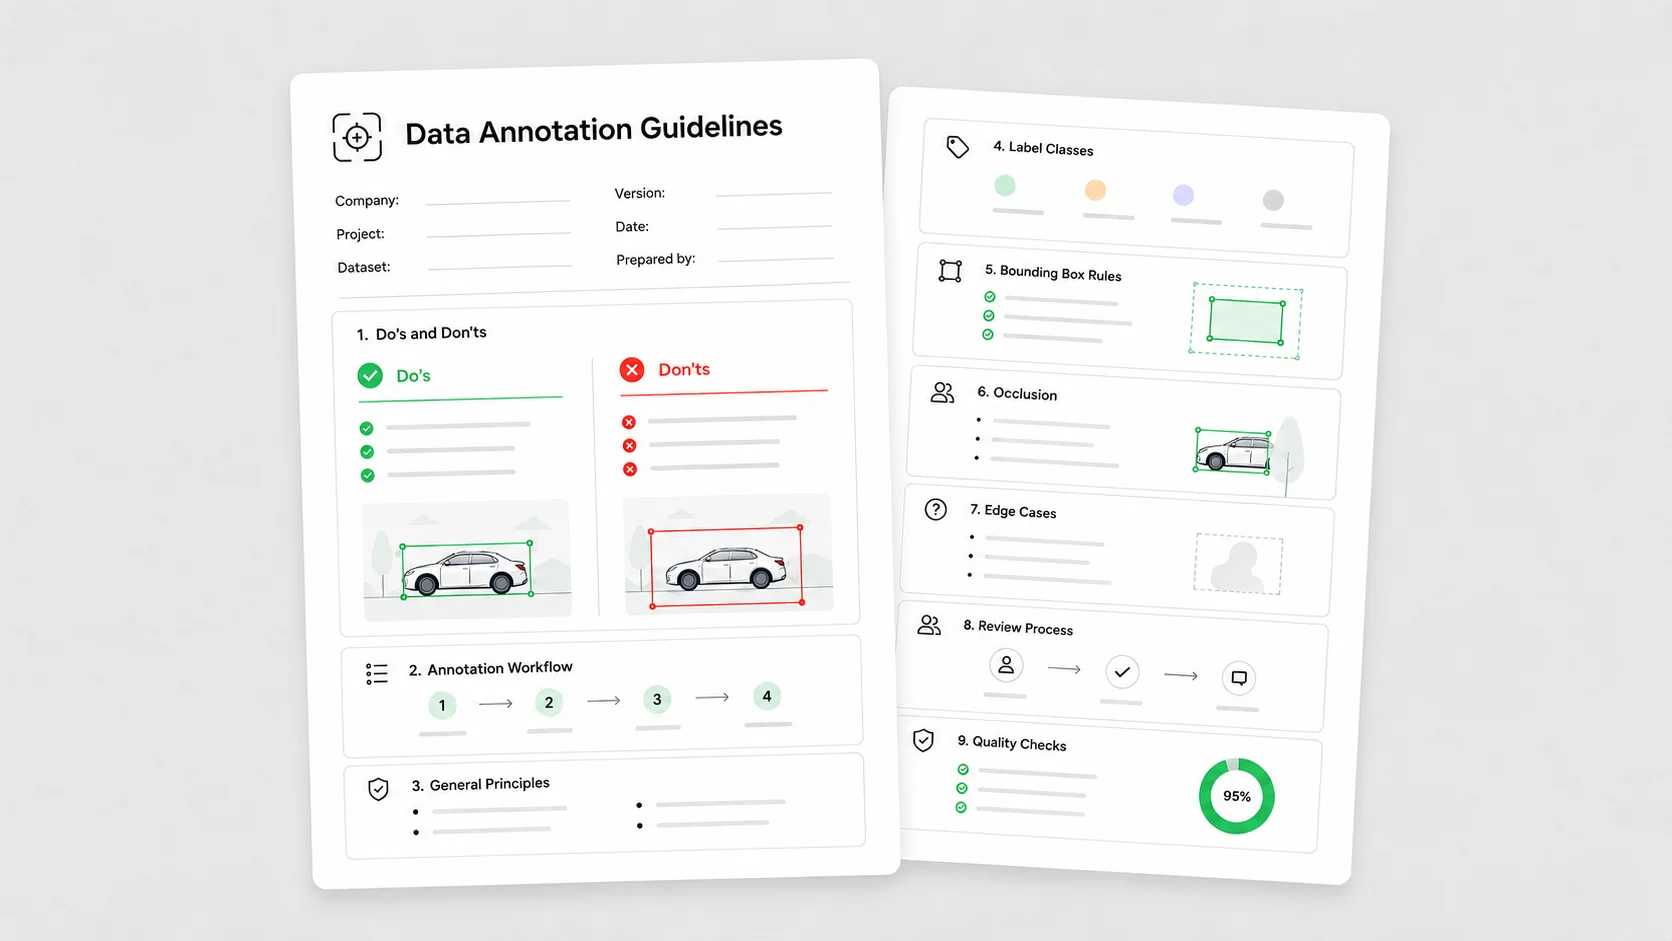
Depending on the project, a complete annotation guideline document typically includes:
- Task description and project context — what the AI model will do and why the data is being collected. Annotators who understand the end goal can make better judgment calls when edge cases appear.
- Class definitions with examples — every label needs a clear, unambiguous definition, paired with examples of what qualifies and what does not.
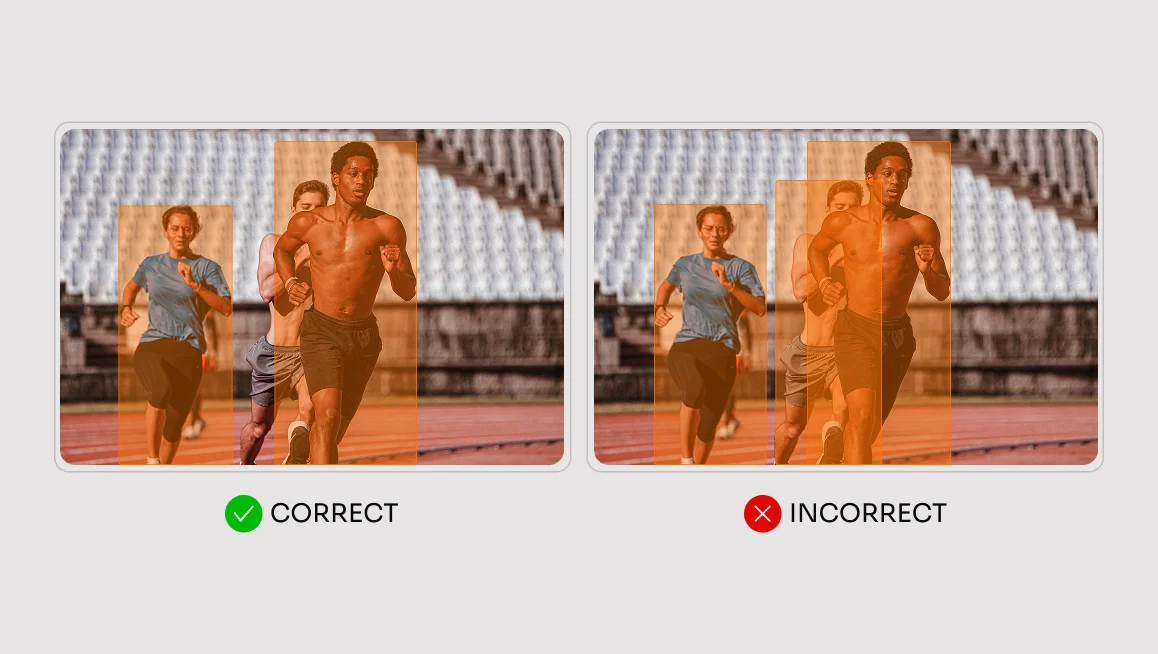
- Annotation rules and constraints — exactly how each label should be applied. Should overlapping objects be annotated separately? Should text annotations capture full sentences or individual key phrases? These decisions should not be left open to interpretation.
- Edge case instructions — the tricky scenarios annotators will inevitably encounter, documented in advance with explicit rules for how to handle each one.
- Quality requirements — what “finished” looks like. Minimum acceptable accuracy, overlap thresholds, geometry precision, and review criteria that help annotators and reviewers work toward the same standard.
Without clear guidelines, every judgment call gets made differently by every person, and your dataset reflects that inconsistency. Covering all of these areas transforms your guidelines from a loose set of instructions into a reliable reference document that annotators, reviewers, and project managers can depend on throughout the project.
The Anatomy of Production-Ready Annotation Guidelines
Production-ready annotation guidelines do more than explain what each label means. They turn project goals into concrete labeling decisions that annotators can apply consistently across thousands or millions of data points.
That means defining not only which objects, regions, events, or text spans should be labeled, but also how each annotation should be drawn, how precise it needs to be, when an instance should be skipped, and how reviewers should evaluate the final output.
The problem is rarely the annotators. It is often a curse of knowledge. AI teams know their product, data, and model goals so well that they focus on what the ideal annotation should look like, but forget to document the operational details that make consistency possible: class boundaries, geometry rules, quality thresholds, occlusion policies, and edge-case decisions.
That is where annotation guidelines either hold up or fail.
Whether you are using bounding boxes, polygons, segmentation masks, keypoints, or another annotation type, your guidelines must define the following elements with precision.
1. Class Definitions and Ontologies
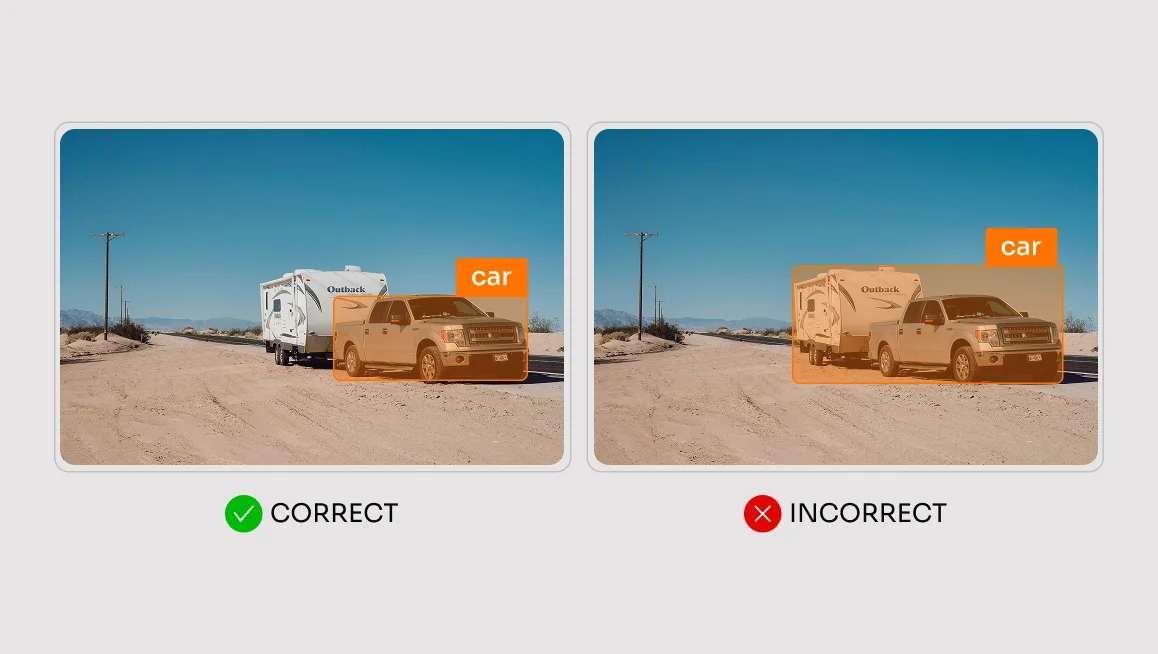
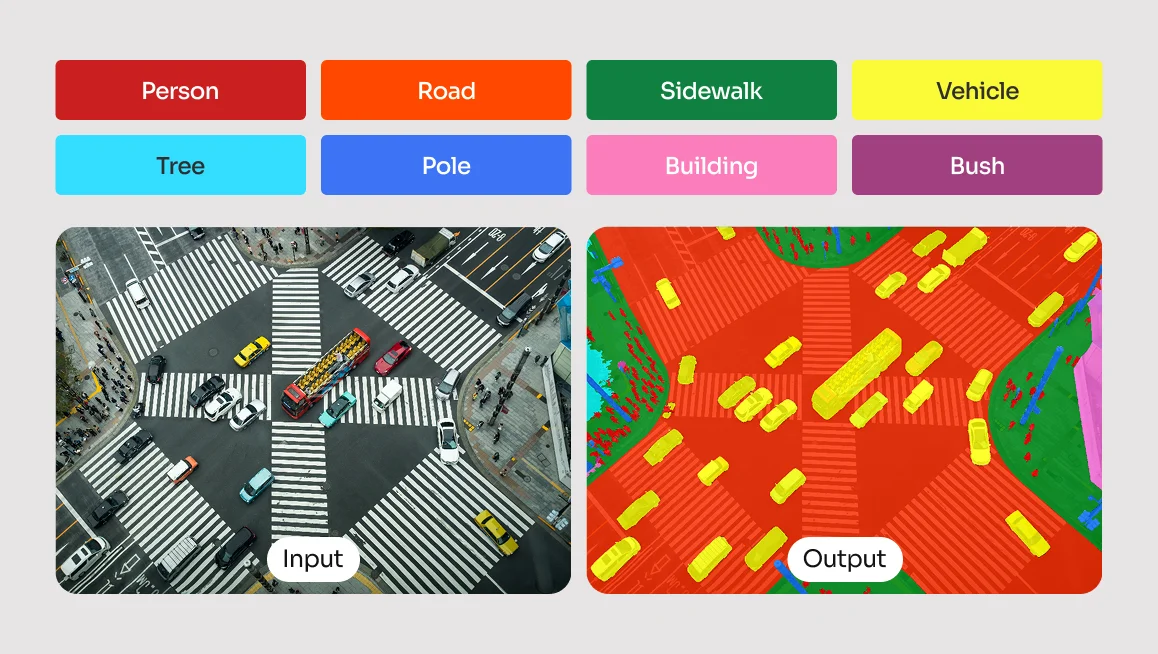
Do not just list the classes. Define each class by its boundaries, exclusions, and relationship to other labels. If your task is semantic segmentation for autonomous driving, “vehicle” alone is not enough. Specify:
- Does “vehicle” include motorcycles?
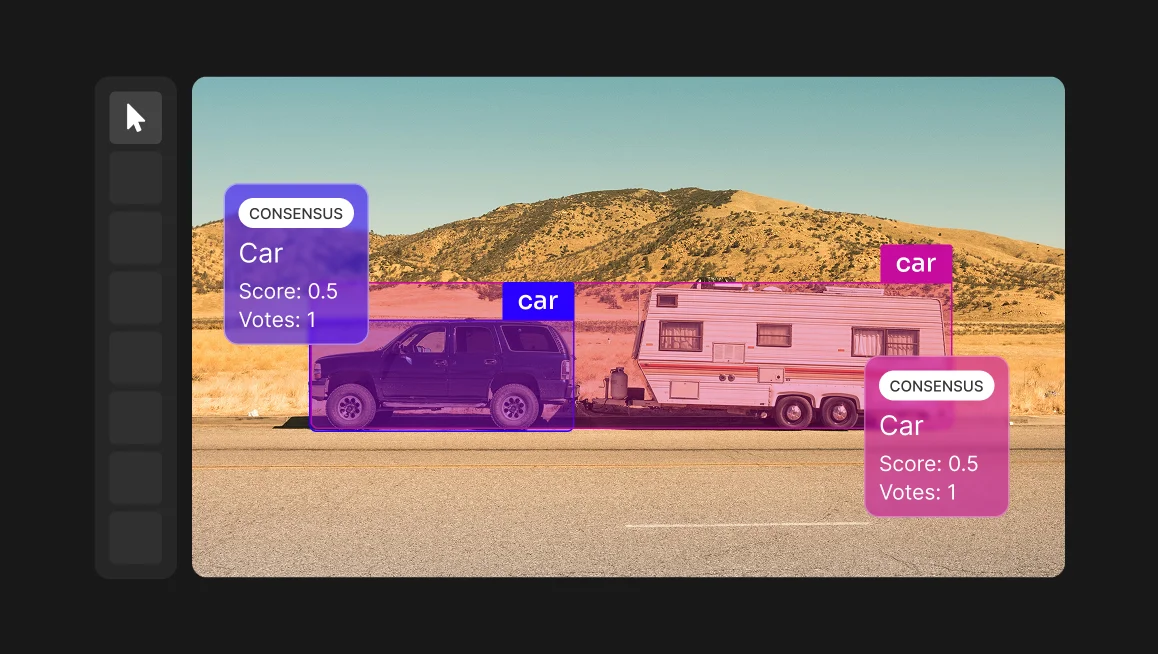
- Does it include a car parked on a trailer?
- What about a reflection of a car in a glass building?
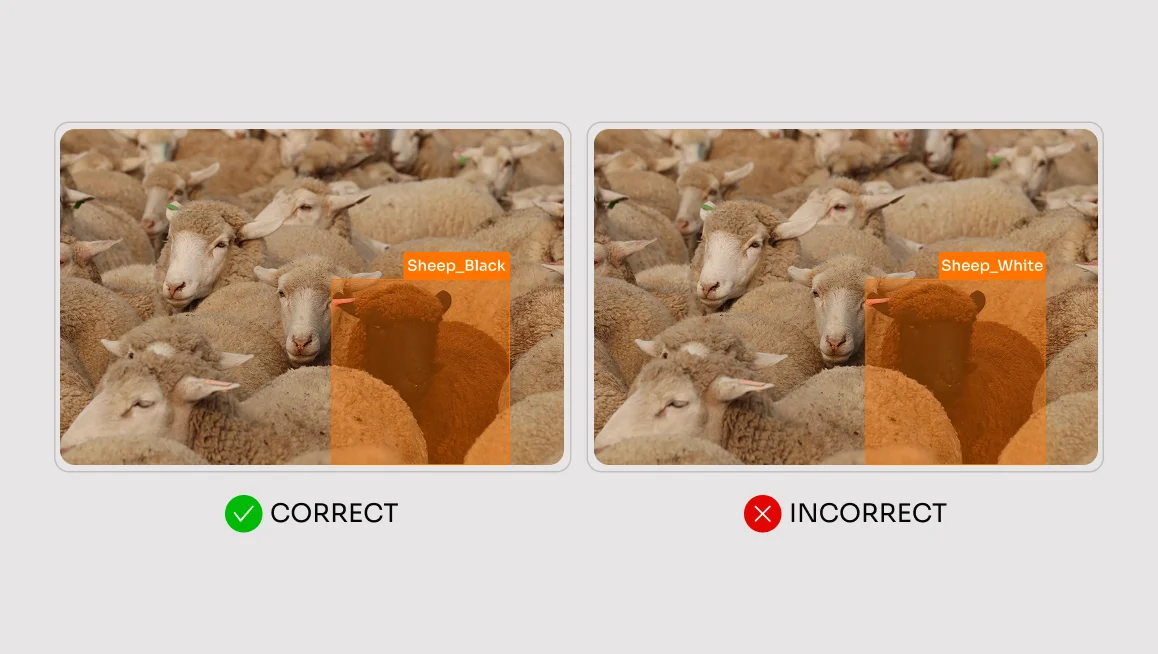
Class definitions should also include annotated examples. Abstract definitions only go so far; annotators need to see what a correct final output looks like. Include positive and negative examples for each class, especially when classes are visually similar, ambiguous, or easy to confuse.
Experienced annotators usually ask for more detailed class definitions and additional examples of high-quality annotations. They want to understand exactly what the final output should look like.
Kais Mter,
Project Manager, CVAT Labeling Services
For example, if “vehicle” includes cars, buses, trucks, and motorcycles but excludes trailers, reflections, toy cars, and partially visible vehicles below a certain size threshold, the guidelines should show examples of each. A written definition tells annotators the rule. A visual example shows them how to apply it.
Class complexity also needs a threshold. If an annotator has to choose from 50 different classes for a single object, annotation speed drops and error rates climb. When you need deep granularity, use a hierarchical approach — for example, Class: Vehicle, Subclass: Truck — rather than a flat list of dozens of discrete labels.
This matters especially in defect-annotation projects, where multiple defect types can look nearly identical, and class definitions can quickly begin to overlap or contradict each other.
The more classes a project contains, the harder it becomes to create robust guidelines. For example, in defect annotation projects, multiple defect types may look very similar. As a result, class definitions often overlap or even contradict each other. The greater the number of classes, the more difficult it becomes to maintain clear and consistent annotation rules.
Kais Mter,
Project Manager, CVAT Labeling Services
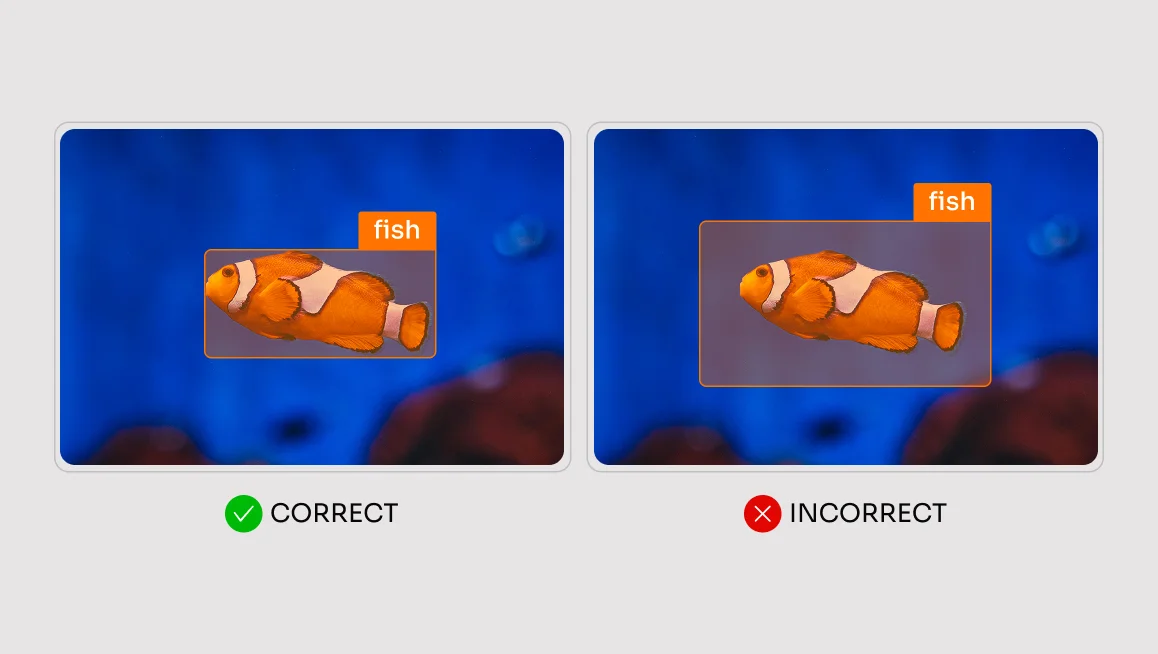
2. Annotation Geometry and Tightness
“Draw a box around the object” is a guaranteed path to inconsistent data. You also need to define how tight the annotation should be.
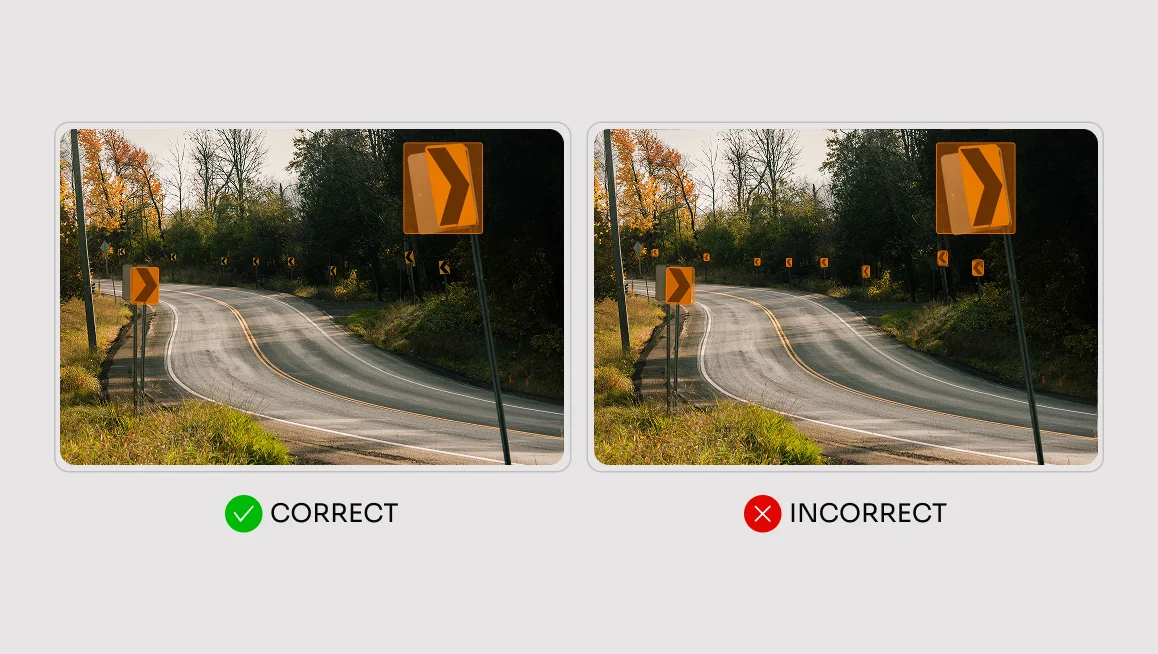
- For bounding boxes, specify whether the box should encompass the outermost visible pixels of the object or whether a gap is acceptable, and if so, how many pixels wide it should be.
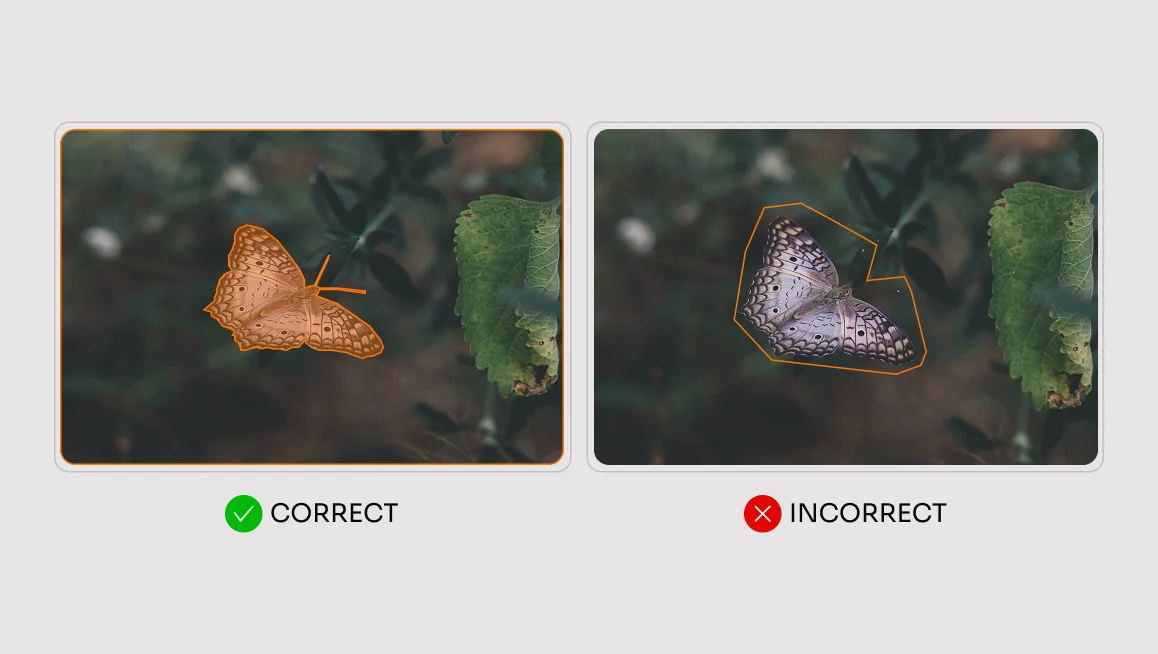
- For segmentation masks, define how closely the mask should follow the object boundary, how to handle soft or blurry edges, and whether small gaps, shadows, holes, or transparent regions should be included.
- For skeleton annotation, precision is even more critical and the challenge goes deeper than geometry:
Clients may define keypoints based on joints, muscles, or skeletal landmarks. In practice, aligning these definitions can be surprisingly difficult because the human body itself is a giant edge case. People appear in countless poses, and the anatomical landmarks needed for annotation are often partially or completely occluded. This creates many ambiguous situations that are difficult to anticipate beforehand.
Kais Mter,
Project Manager, CVAT Labeling Services
Or, take a simpler example: annotating the corner of an eye for a facial recognition model. The guidelines must state exactly which pixel constitutes the corner. Is it the inner tear duct? The outer edge of the eyelashes? Without this clarity, annotator A will click the tear duct, annotator B will click the lash line, and your model will learn nothing but noise.
3. Quality Requirements
Quality requirements define what “finished” means. They set the standard annotators and reviewers use to decide whether an annotation is accurate enough to move forward.
These requirements directly affect annotation cost, speed, review effort, and workflow design. If your guidelines do not define the expected precision level, annotators will calibrate to their own standard. Some will work faster and looser. Others will be meticulous and slow. Neither approach is wrong without a written target, but together they produce inconsistent data.
Your guidelines should define measurable quality criteria wherever possible, such as:
- Acceptable IoU range for bounding boxes
- Maximum tolerated gap between a mask edge and the object boundary
- Expected polygon vertex density for curved or irregular shapes
- Minimum object size for annotation
- Rules for handling blurry, transparent, shadowed, or partially visible regions
- Review criteria for when an annotation should be accepted, corrected, or rejected
For example, “draw a tight polygon around the object” is too vague. A stronger requirement would specify how closely the polygon should follow the object boundary, whether small holes should be included, and how much deviation from the visible edge is acceptable.
Define quality requirements before annotation begins — not after you have reviewed the first batch and realized the output does not match your expectations.
4. Handling Occlusion and Truncation
Occlusion is where many models struggle. It is also where many guidelines go silent.
Set a clear threshold: “If more than X% of the object is occluded, do not annotate.” Then define how the visible object should be annotated. Should the annotator draw the bounding box around only the visible portion, or estimate the full extent of the object behind the occlusion? The answer depends on the task.
For many object detection and segmentation projects, labeling only the visible portion may be the right approach. For multi-object tracking, amodal perception, or tasks that require consistent object boundaries across frames, estimating the full object extent may be required. In some cases, you may also need an occlusion attribute so the model can distinguish between fully visible and partially hidden instances.
The point is not that one convention is always correct. The point is that the convention must be explicit. Annotators will not assume it correctly.
5. Edge Cases and Ambiguity
You cannot predict every edge case before annotation begins, but you must define a process for handling them.
When annotating medical data, for example, tissue boundaries are often blurry. For segmentation tasks, your guidelines must state whether an annotator should err on the side of over-segmentation, capturing nearby tissue to ensure no anomaly is missed, or under-segmentation, labeling only confirmed abnormal regions.
Leave this decision to individual judgment, and you will end up with a dataset that no two annotators agree on.
Usually, the problem is that the guidelines have never been tested in a real production environment. Most corner cases only become visible once annotation begins. The best way to improve guidelines is to have people who are unfamiliar with the project use them and then identify the questions, ambiguities, and edge cases that emerge during the process.
Kais Mter,
Project Manager, CVAT Labeling Services
The same principle applies across common domains. In retail shelf detection, should a partially obscured product be annotated as a full instance or only by its visible face? In autonomous driving, should a pedestrian whose legs are hidden behind a parked car receive a full bounding box or a cropped one?
These are not rare edge cases that will appear occasionally. They are scenarios your annotators will encounter in the first hour of work. Answer them before that happens.
Validating and Piloting Your Guidelines Before Scaling
Never deploy a new set of annotation guidelines to a team of 50 annotators. Pilot them first. The goal of a pilot is not to generate training data. It is to stress-test your guidelines.
Have three independent annotators label the same representative sample of your most complex examples using the new guidelines. For image and video tasks, 100 challenging frames can be a useful starting point. For audio or text, use an equivalent batch of your hardest clips, recordings, or passages.
Then compare the outputs, identify where annotators diverged, and treat every disagreement as a signal. If trained annotators interpret the same instruction differently, the guidelines are not yet clear enough.
In professional data labeling, consistency targets vary by task type, domain, and model objective. For classification tasks, a Cohen’s Kappa of 0.8 or above is commonly treated as strong agreement. For localization tasks such as bounding boxes or polygons, Intersection over Union is usually the more relevant metric. While acceptable thresholds vary, 0.7–0.8 IoU is often used as a practical benchmark for object detection.
These numbers are not universal rules. They are starting points for deciding whether your guidelines are clear enough for production. If agreement falls below your target, do not assume you have an annotator problem. Start by looking for a guideline problem.
The best signal during a pilot is strong agreement between independent annotators on your hardest cases — not your easiest ones. If your pilot set only contains clear, representative examples, high agreement does not tell you much. Issues will surface once annotation scales to the ambiguous, atypical examples that make up real datasets.
Deliberately include difficult cases in the pilot: heavy occlusion, unusual poses, blurry boundaries, visually similar classes, low-resolution objects, and borderline examples. If annotators agree on those, your guidelines are much closer to production-ready.
When reviewing pilot results, focus on systemic issues across scenes, object categories, or label types — not isolated mistakes. Fixing one-off errors without addressing the root cause can mask the real problem and weaken your validation process.
Find the examples where annotators disagreed. Discuss why they made different choices. Then update the guidelines to explicitly cover that scenario.
Example of a Good vs. Bad Annotation Guidelines
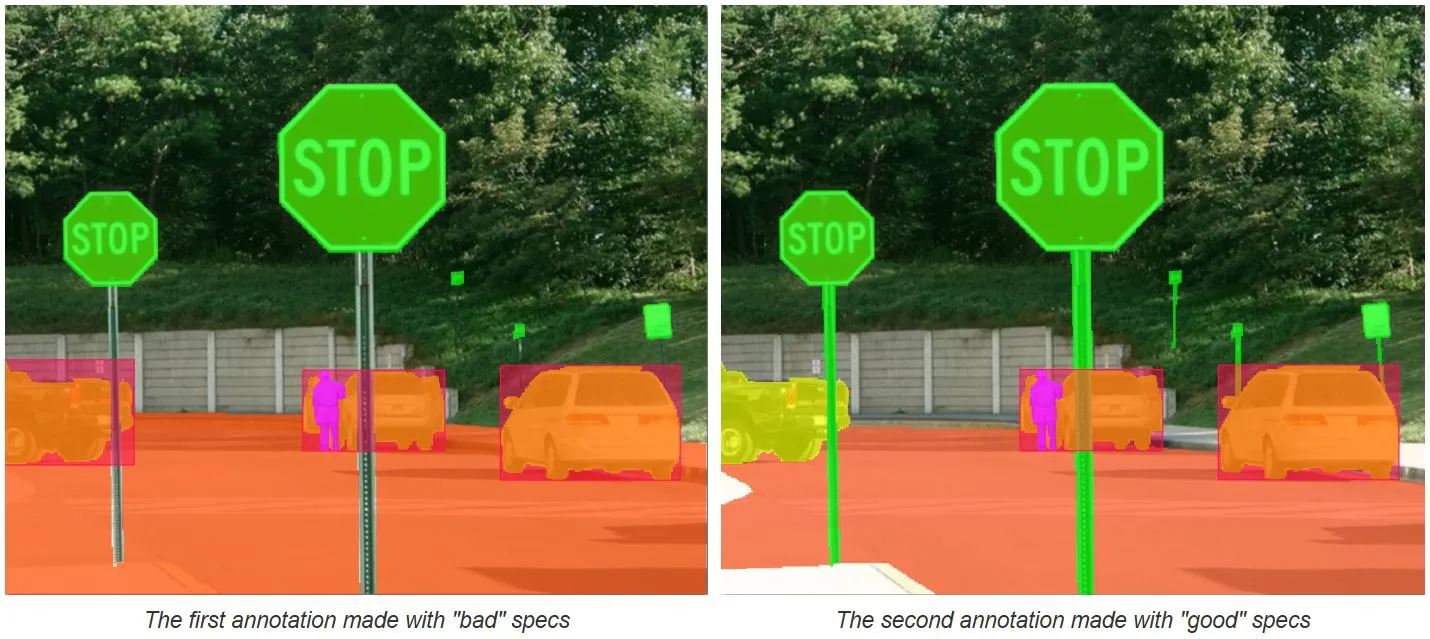
Side-by-side comparisons make the value of precise guidelines easy to see. Consider a parking lot scene with cars, road signs, people, trees, sidewalks, and fences. Two annotators receive the same image, but each gets a different set of guidelines.

The weak guidelines say:
“Annotate the road, signs, people, and vehicles using masks. Transportation must additionally be annotated with boxes.”
No quality requirements. No examples. No occlusion rules. No guidance on where the road ends or whether signposts should be included.
The production-ready guidelines say:
1. “Annotate vehicles with a tight bounding box, with no more than a 3px gap from the outermost visible pixel.
2. If a vehicle’s visibility is below 50%, annotate it based on its visible boundaries and set the `Occluded` attribute. Do not annotate vehicles that are more than 80% occluded.
3. Annotate signs together with their posts as a single object.
4. Road segmentation masks end at the curb edge and exclude the sidewalk.”
The weak guidelines produce predictable inconsistency. One annotator may include the sidewalk as part of the road. Another may exclude signposts. A third may draw loose boxes around vehicles to save time. None of these decisions are obviously “wrong” because the guidelines never define the correct behavior.
The production-ready guidelines give annotators less room to improvise. They define geometry, visibility thresholds, class boundaries, and object inclusion rules. The result is more consistent annotation that aligns with what the project actually needs.
Applied at scale, the difference between weak and production-ready guidelines can mean thousands of inconsistent labels, delayed review cycles, and models that fail to perform reliably in production.
Build Better AI With Better Annotation Guidelines
High-quality models are not built on algorithms alone. They are built on unambiguous, consistently labeled data.
Writing annotation guidelines that produce that data means moving beyond generic instructions and addressing the granular realities of class definitions, geometry tightness, occlusion thresholds, edge cases, and inter-annotator agreement.
If you want expert support turning those rules into production-ready data, CVAT Labeling Services can help. Our team works with you to refine annotation guidelines, run pilot labeling, resolve ambiguity, apply QA checks, and deliver labeled datasets with measurable quality reporting.
Bring us your labeling brief, existing guidelines, or project requirements, and we’ll help turn them into ground truth data your model can actually learn from.
Get labeling support from CVAT
Frequently Asked Questions About Annotation Guidelines
What Is Text Annotation and How Does It Differ From Other Types?
Text annotation is the process of labeling written content so that machine learning models can understand natural language. It is one of the most widely used annotation types in AI development today, yet it is often misunderstood by teams coming from a computer vision background.
Unlike image tasks, where annotators draw shapes around physical objects, text annotation works at the level of language. Annotators tag entities, phrases, and relationships inside written data. A single sentence might require multiple overlapping labels depending on the task.
Common examples include entity recognition, where specific names, locations, or organizations are identified and tagged, and semantic annotation, which captures what a sentence actually means rather than just what it literally says. Both require clear, detailed guidelines to produce consistent results.
How Are Annotation Guidelines Used in Natural Language Processing?
Natural language processing models learn from labeled text data, and annotation guidelines are what make that data reliable. Without them, two annotators working on the same document will interpret the same sentence differently and produce labels that cannot be compared or combined.
This matters most in tasks where meaning is subjective. Sentiment annotation is a good example. A phrase can carry a completely different emotional weight depending on its context, the surrounding sentences, or even the domain the text comes from. Guidelines define how to handle those cases so every annotator reaches the same conclusion.
Can Annotation Guidelines Be Used in Educational Settings?
Annotation guidelines are not just for professional labeling teams. Teachers have started using them as a teaching tool, and the results have been strong. Bringing real labeling tasks into a classroom gives students direct exposure to how ideas from machine learning and natural language processing are applied in practice.
Working through a structured annotation task forces students to think carefully about language, ambiguity, and decision-making under uncertainty. These are skills that matter well beyond data labeling. A student who has written and applied their own annotation guidelines understands the connection between raw data and model behavior in a way that a lecture alone cannot teach.
Guidelines also make group annotation projects easier to manage. When everyone in the classroom is working from the same document, instructors can compare outputs, identify where interpretations diverged, and use those differences as a starting point for discussion. It turns an abstract concept into something concrete and measurable.


.svg)
.png)

.png)


.png)