


CVAT (Computer Vision Annotation Tool) is a modern and flexible web-based tool for annotating images and videos used in computer vision tasks. CVAT provides manual, automatic, and semi-automatic annotation capabilities, allowing users to define object boundaries and classes, which are essential for training and testing machine learning models.
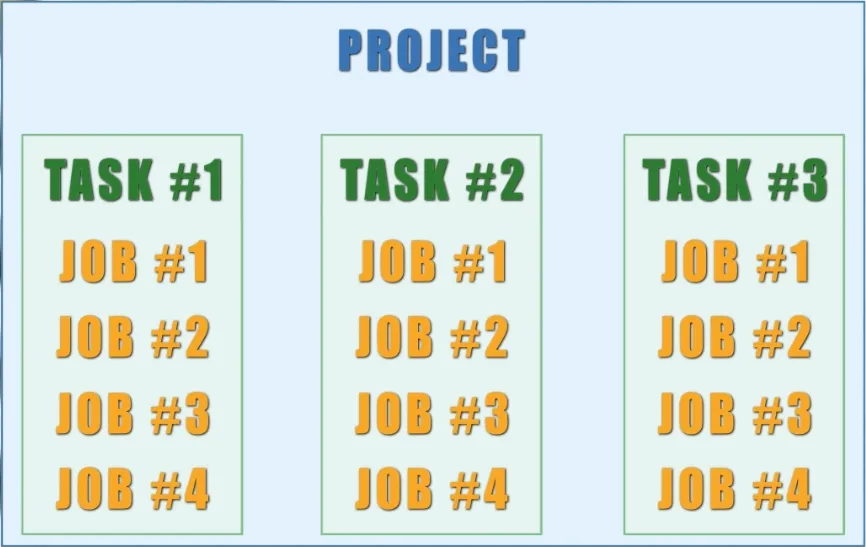
In CVAT, the annotation workflow is organized in a hierarchical structure: Project → Task → Job. At the top level are projects, within which individual tasks are created. Each task can be divided into several jobs to facilitate distribution among annotators. Annotation is always performed at the job level; jobs are an integral part of a task and cannot be deleted or exist independently.
After logging into the CVAT interface, the Tasks page opens by default, displaying all tasks created by the user or assigned to them. From this page, users can also navigate to other sections, including Projects and Jobs.
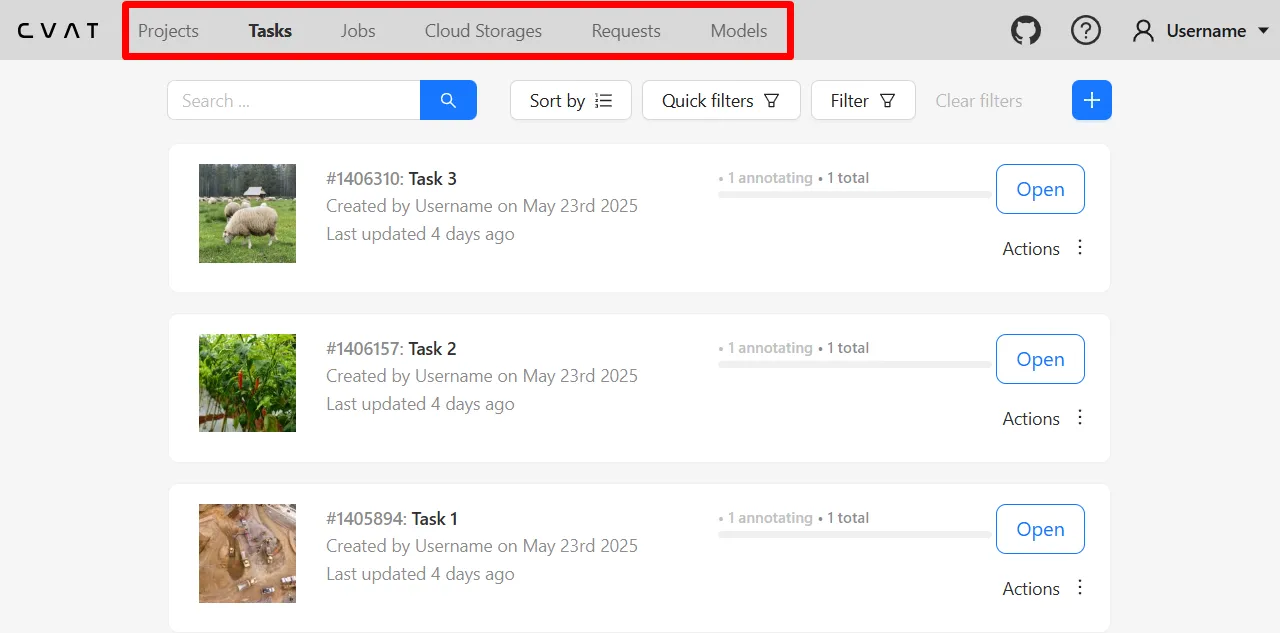
In addition to the main sections, the interface also includes several additional tabs:
- Cloud Storages — used to connect external cloud storage services (More details: Cloud storages page | CVAT);
- Requests — allows tracking the status of operations such as task creation, dataset export, or import (More details: Requests page | CVAT);
- Models — contains pre-installed models for automatic or semi-automatic annotation, and also allows uploading custom models (More details: Models | CVAT).
In this material, we will focus primarily on the key sections: Projects, Tasks, and Jobs, as well as the annotation interface, since these form the core of an annotator's daily work. We will now take a closer look at each of them.
Projects
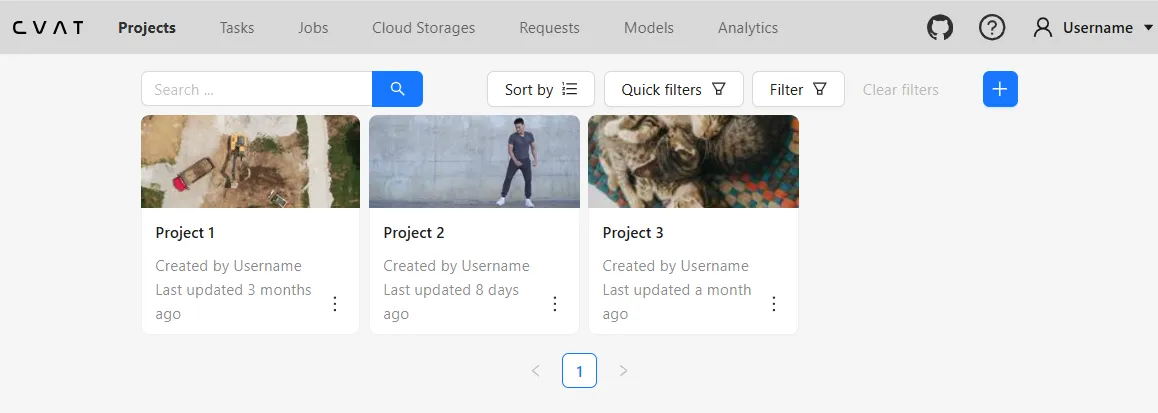
In the CVAT system, the workflow is organized through projects. Projects play a key role in organizing, standardizing, and scaling the annotation process, especially when teams of annotators, validators, and team leads are involved. (More details: Projects page | CVAT)
Centralized Task Management
A project in CVAT serves as a container that groups together all tasks related to a specific topic, data type, or research objective. This simplifies workflow navigation, especially when managing a large number of tasks and team members.
Unified Annotation Schema
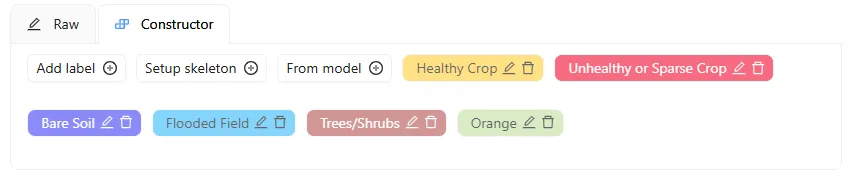
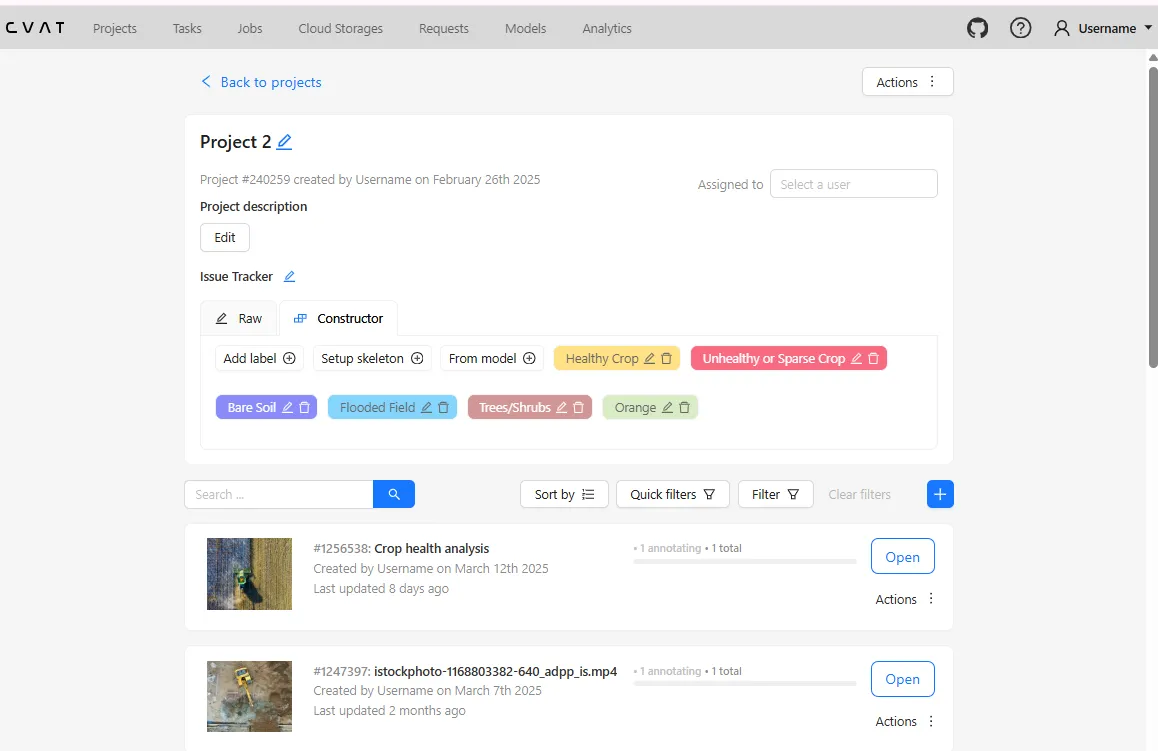
One of the main advantages of projects is the ability to define a unified label schema that is automatically applied to all tasks within the project. This ensures annotation consistency and helps prevent errors caused by inconsistent terminology or accidental use of different classes for the same object.
Team Collaboration Management
Projects make it easy to organize collaborative work: annotators, validators, and team leads can be assigned, with roles and access rights distributed accordingly. This makes the system especially useful for companies and research groups working on large datasets.
Tasks
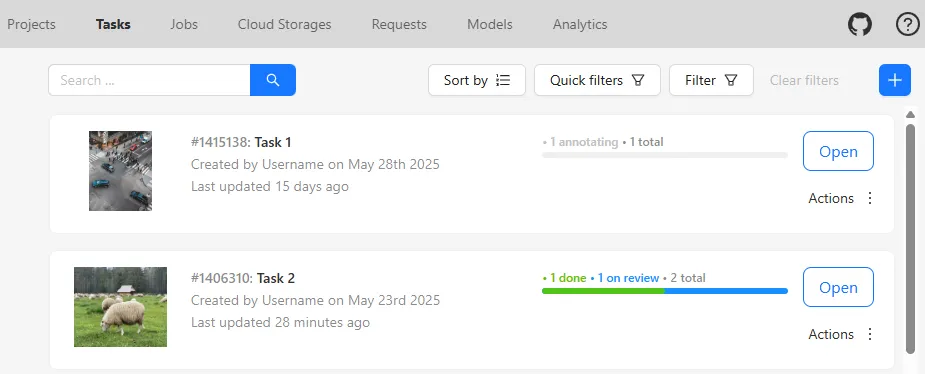
Tasks occupy a central place in the CVAT structure and serve as the primary unit of data processing. Each task groups together the uploaded images or videos. (More details: Tasks page | CVAT)
Content and Structure of Tasks
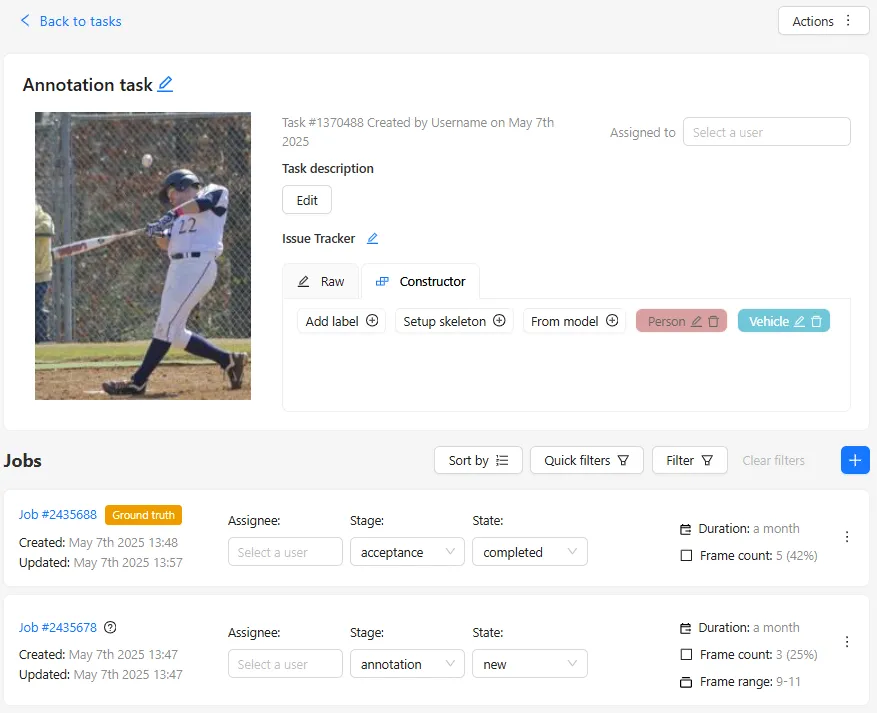
A task contains a set of media files to be annotated and inherits the label schema from the project it belongs to. If a task is created outside of a project, the label schema is defined individually. Thus, a task specifies what exactly needs to be annotated and according to which rules. (More details: Task details | CVAT)
Subdivision into Jobs and Progress Tracking
After creation, a task is divided into one or more jobs. This allows the workload to be distributed among multiple annotators or the annotation to be performed in parts. The division is based on the number of frames or images, according to manually set parameters during task creation. The task interface allows tracking of progress status, annotator activity, and annotation quality (when Ground Truth or HoneyPots are available).
Job
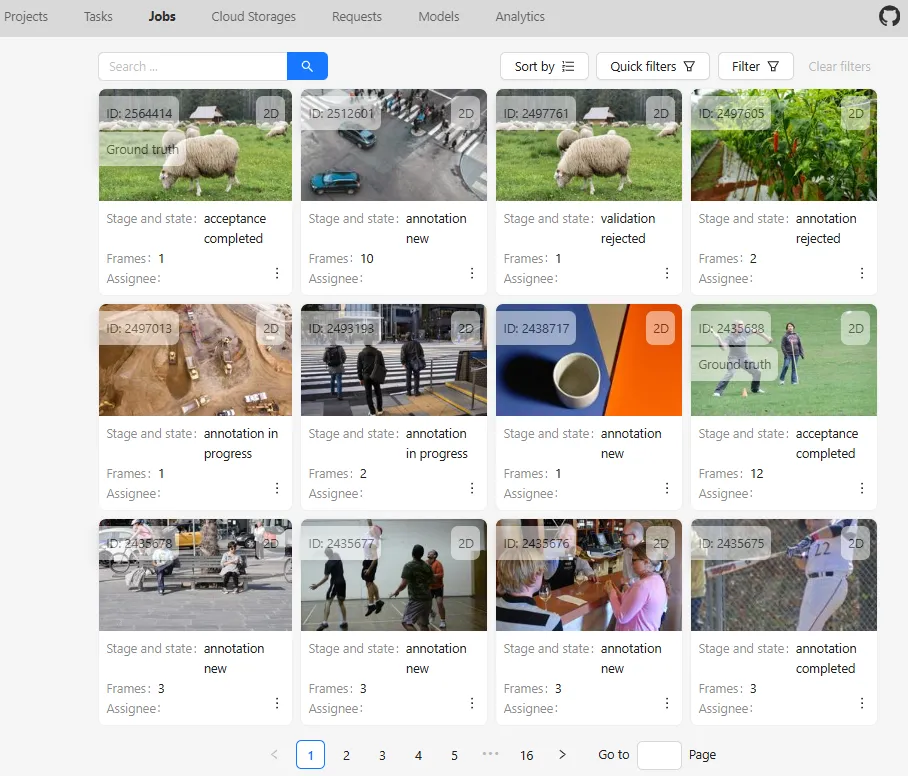
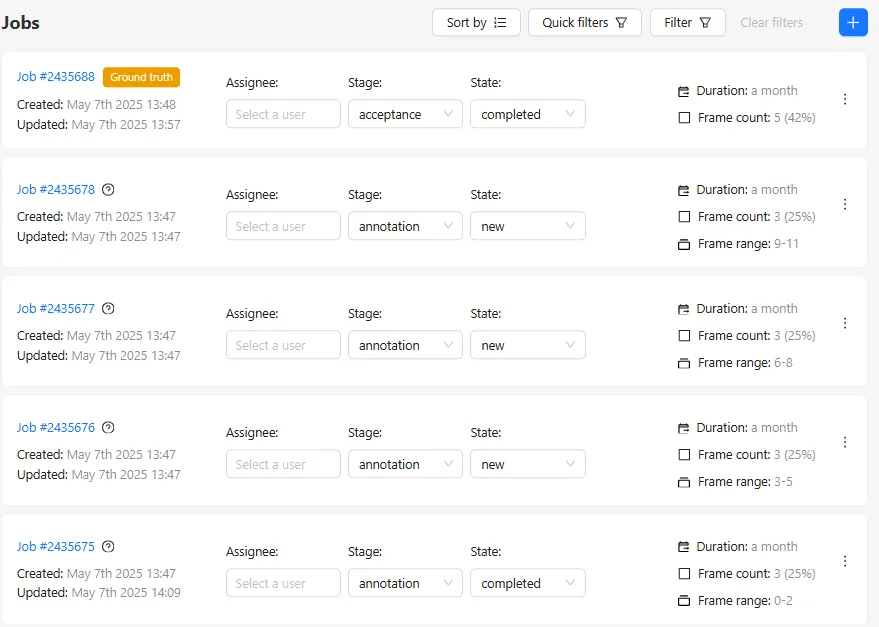
The Jobs page displays all available jobs and also serves as a personalized list of all jobs assigned to a specific user. It shows tiles for each job, with each tile corresponding to a separate segment of a task designated for annotation.
This section gathers all active jobs assigned to the annotator, which may belong to different tasks and even different projects. This is convenient because the annotator doesn’t need to navigate through individual tasks on the Tasks page to find their active assignments — everything they need is collected in one place. (More details: Jobs page | CVAT)
Navigating to Annotation
Clicking on any job tile opens the annotation interface. This is the main workspace where all annotation work is performed.
Convenient Work Distribution
Jobs allow the client or task coordinator to evenly distribute the workload among multiple annotators. Each annotator receives only the jobs assigned to them and sees these jobs on their personal page. This reduces the risk of overlap and errors in task assignment.
Annotation Interface
The annotation interface is the central workspace in CVAT where data annotation is performed. You can access it in two ways: by selecting the desired job on the task page or by opening it directly from the Jobs page, which displays all the jobs assigned to the user.
The annotation interface combines various panels and tools, organized to enable the annotator to work sequentially and efficiently — from reviewing requirements to creating, editing, and verifying objects.
It is important not only to know where the buttons are located but also to understand how the interface is designed from a practical perspective. Familiarity with its features, including settings, keyboard shortcuts, and filters, helps speed up the annotation process, avoid mistakes, and focus on the task content rather than technical details. (More details: CVAT Annotation Interface)
1. Settings
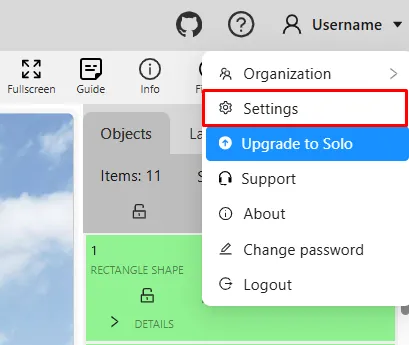
CVAT offers a wide range of options with a variety of settings. To open the settings panel, simply click on your username in the top right corner and select Settings from the dropdown menu, or use the keyboard shortcut F2. (More details: Settings | CVAT)
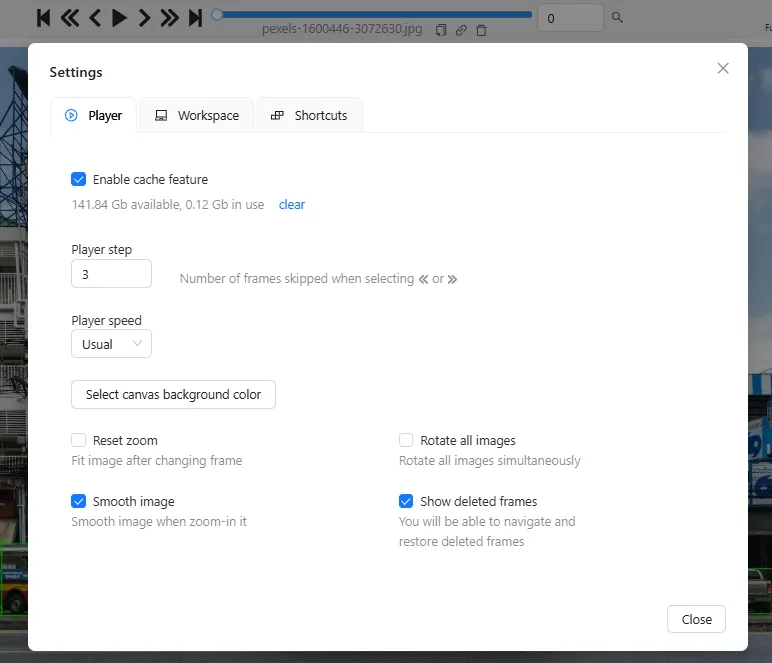
In the settings, you can adjust video playback parameters: change the player speed, set the frame step, enable or disable autosave, and configure the display of information about annotated objects. Additional options are also available here to activate or deactivate various CVAT features, which is especially convenient when working with different types of tasks.
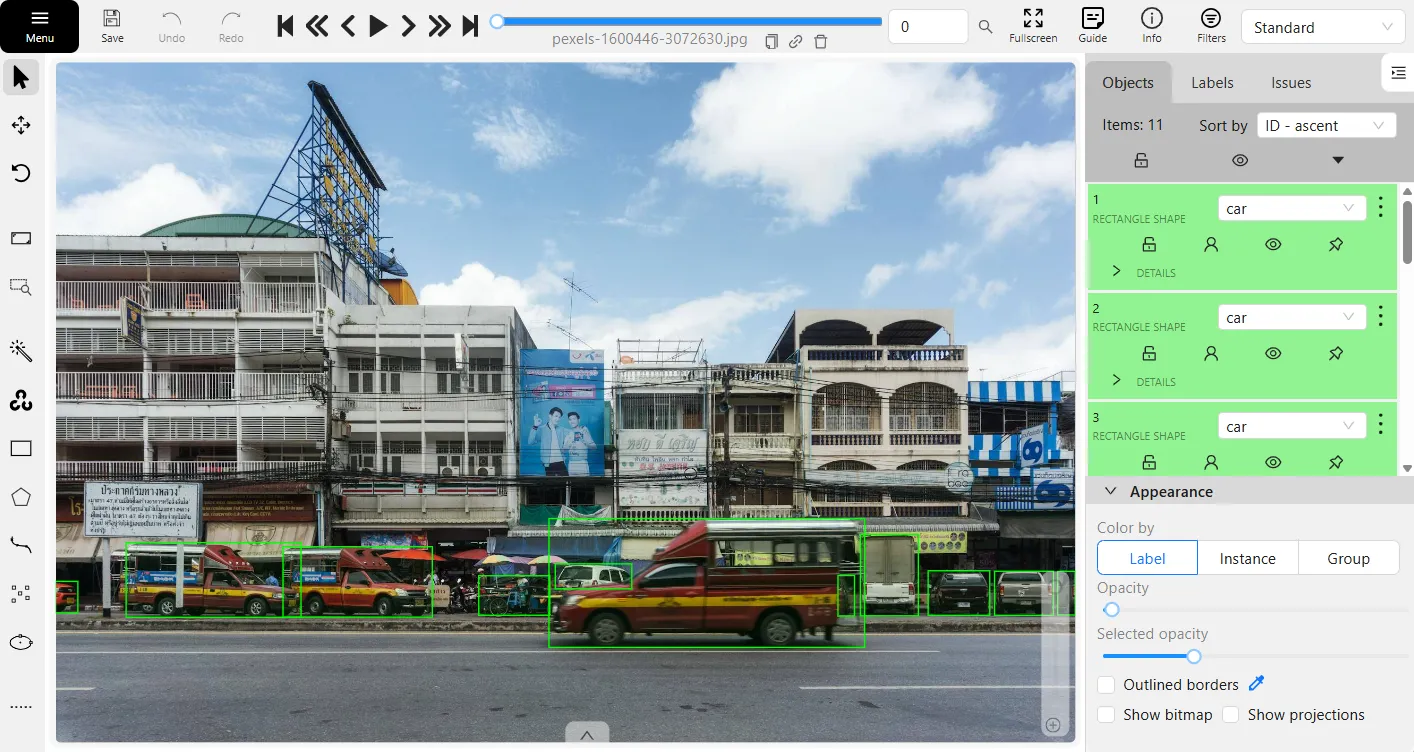
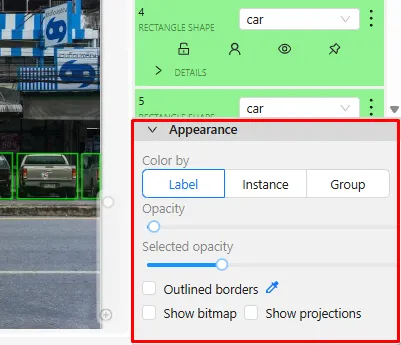
An additional section, Appearance, located on the objects sidebar, allows you to customize the visual style of annotations, including colors, transparency, and other visual parameters of the objects. (More details: Objects sidebar | CVAT #Appearance)
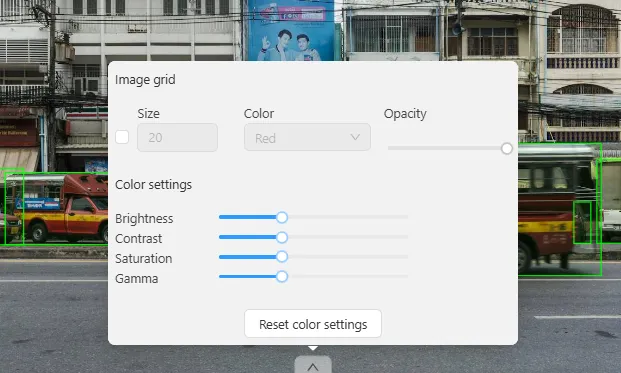
There is also an option to adjust the brightness and contrast of the image. These settings are located at the bottom of the workspace and can be accessed by clicking the arrow. The option to enable a grid is also available here. (More details: Workspace | CVAT #Image settings)
2. Reviewing Task Requirements and Navigation Interface
Before starting annotation, it is important to carefully review the instructions and task parameters. This helps the annotator understand which objects need to be annotated, which classes and attributes to use, as well as the quality and formatting requirements for the annotations.
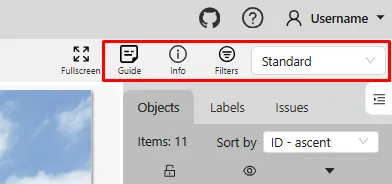
The top panel of the interface includes several key elements:
- The Guide button opens a detailed instruction for the task. It describes which objects need to be annotated, their structure, the available classes, and special considerations to keep in mind during annotation.
- The Info button displays information about the task: total number of frames, start and end frames, the user assigned to the job, as well as statistics on annotated objects by class. This allows for a quick assessment of progress and workload.
- The Filters button opens the object filtering menu. This feature allows you to filter displayed annotations by label, shape, or other criteria. It is especially useful during task validation but also helps during annotation — for example, for self-checking or navigating existing objects.
- The annotation mode is available via a dropdown menu next to these buttons. This menu allows switching between different modes depending on the annotator’s current tasks:
- Standard mode — the default mode where objects are created and edited directly on frames. It is suitable for most tasks and serves as the main working mode. In this mode, the annotator can freely switch between tools, create new objects, edit existing ones, and review annotations.
- Attribute annotation mode — used for bulk or step-by-step filling of object attributes. Useful when the focus is on metadata rather than geometry.
- Single shape mode — restricts the user to creating one object of a specified class per frame, after which the frame automatically switches to the next.
- Tag annotation mode — allows adding tags to images and is used for more convenient and efficient annotation of image classification tasks.
- Review mode — designed for annotation validation. This mode is convenient for checking already annotated objects, identifying errors, and leaving comments.
- Standard mode — the default mode where objects are created and edited directly on frames. It is suitable for most tasks and serves as the main working mode. In this mode, the annotator can freely switch between tools, create new objects, edit existing ones, and review annotations.
Each mode is designed for specific scenarios, and choosing the appropriate mode at the right time helps significantly simplify and speed up the workflow. (More details: Navigation bar & Menu | CVAT #job information and annotation mode switcher)
Understanding these interface elements and using them correctly is key to ensuring that the annotation meets the client’s expectations, is of high quality, and complies with all project requirements.
3. Selecting the Tool and Label
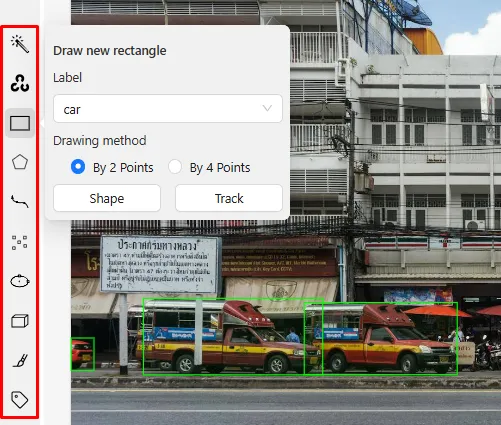
After reviewing the instructions, the annotator selects an annotation tool — the left panel offers tools such as rectangle, polygon, polyline, points, and others. Semi-automatic and automatic annotation modes can also be used by selecting AI Tools.
On the tools sidebar, the annotator chooses the desired shape (rectangle, polygon, or another), selects the label, and then selects the annotation mode: Shape or Track.
In Shape mode, we usually annotate individual images.
In Track mode, we work with video clips where it is necessary to track objects that appear and move throughout the video.
More details:
Controls sidebar | CVAT #Shapes
Shape mode (basics) | CVAT
Shape mode (advanced) | CVAT
Track mode (basics) | CVAT
Track mode (advanced) | CVAT
4. Annotation in the Workspace and Using Shortcuts
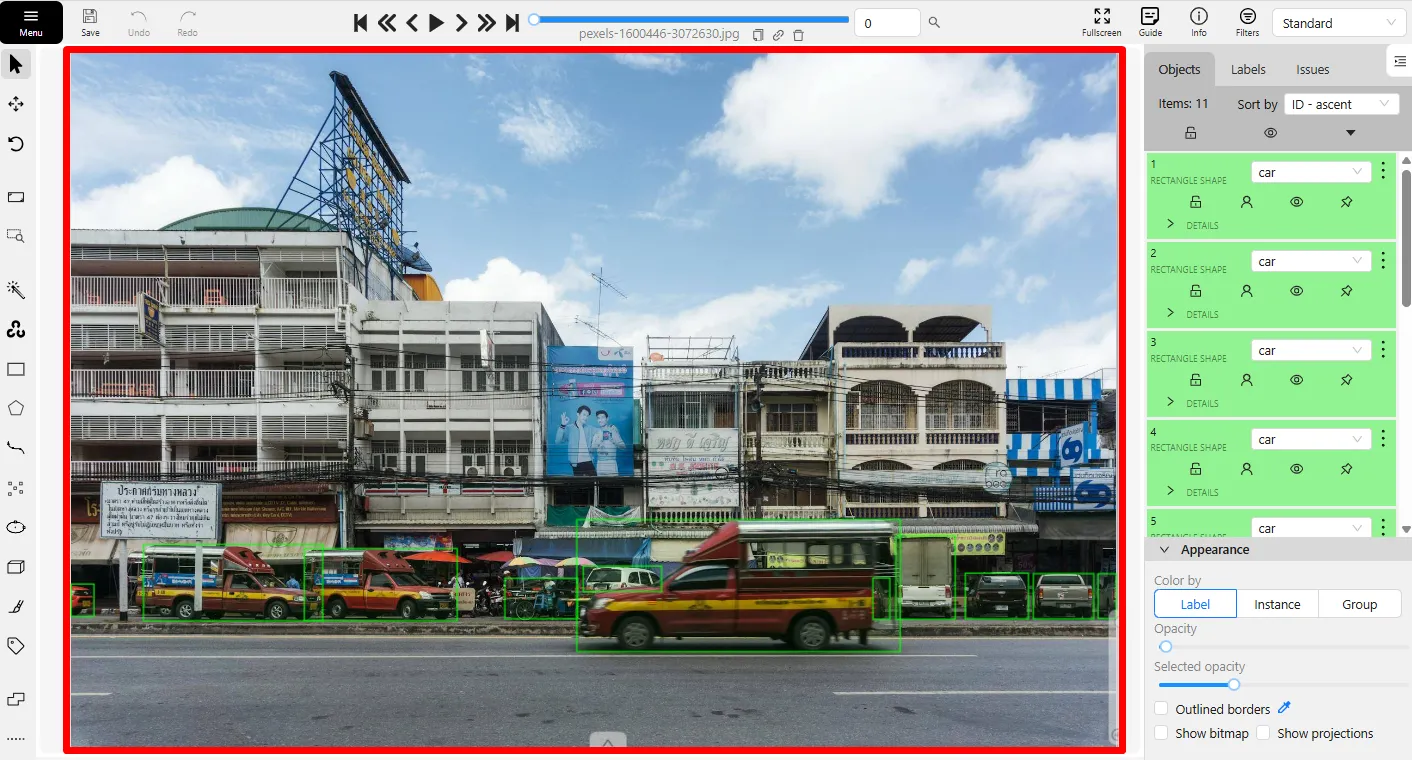
The central part of the screen is the workspace, where the annotator views images or video frames and performs the main annotation work. This is where annotations are created. (More details: CVAT Workspace)
Depending on the data type, different approaches are used: annotating each image individually, interpolation, or tracking.
If needed, images can be zoomed, moved, or rotated — navigation is available both via mouse and keyboard shortcuts.
More details: Shortcuts | CVAT
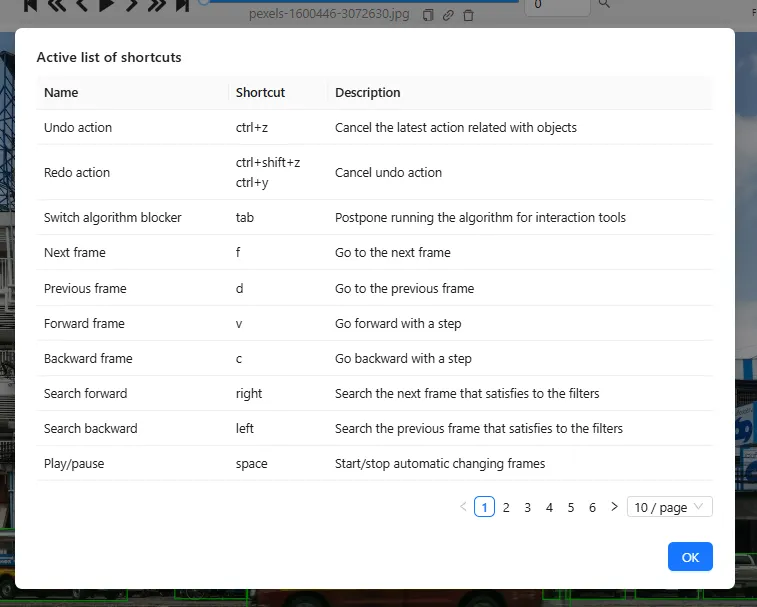
It is also worth highlighting the shortcut key settings. The user can remap almost any key combination, making annotation more convenient and faster. To view the current shortcuts, simply press F1 — a window will open displaying a list of all available shortcuts.
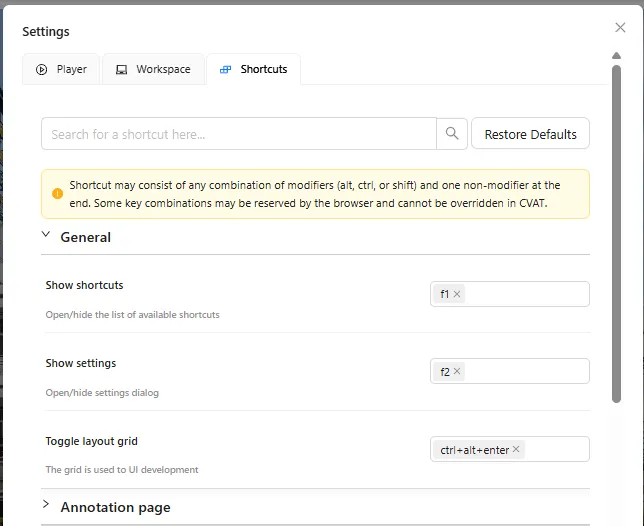
Shortcuts can be modified in the Settings under the Shortcuts tab.
Using shortcuts significantly speeds up the annotation process, as you don’t waste extra time moving the mouse pointer to specific buttons. Learning and using shortcuts is especially important for improving productivity.
5. Task Navigation
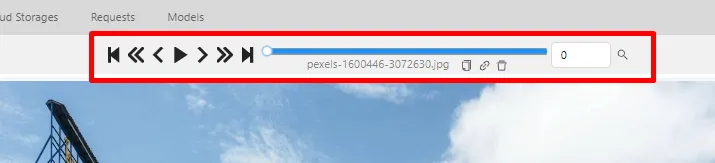
The annotation interface includes a player for navigating through the task. It allows you to view video, move frame-by-frame, jump forward or backward by a specified number of frames, and navigate to the beginning or end of the task. The player bar helps track task progress and quickly jump to an approximate position. By knowing the frame number, you can move directly to it by entering the number or by specifying the file name. All these features enable efficient navigation through the task during annotation or validation.
More details: Navigation bar & Menu | CVAT #Navigation controls
6. Working with the Objects sidebar
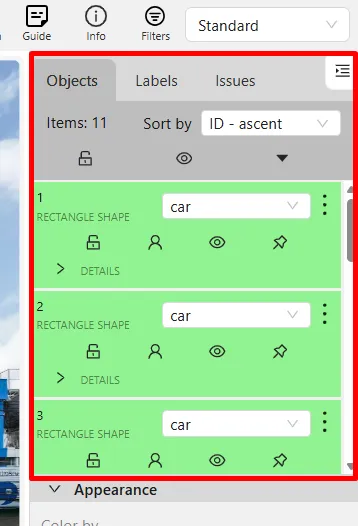
All annotated objects are displayed on the right side of the screen — in the Objects sidebar. Here you can quickly see the list of all annotations present on the current frame, change their labels, and set or refine attributes.
Various properties applicable to the objects are available here. Objects can be sorted using different methods.
There are additional tabs: Labels and Issues.
In the Labels tab, we can see all the labels available in the task, while the Issues tab shows problems found in the task. Issues are added by the validator during task review.
More details:
Objects sidebar | CVAT
Manual QA and Review | CVAT
7. Progress Monitoring and Task Completion
Using the information from the player bar, you can determine when you have reached the end of the task.
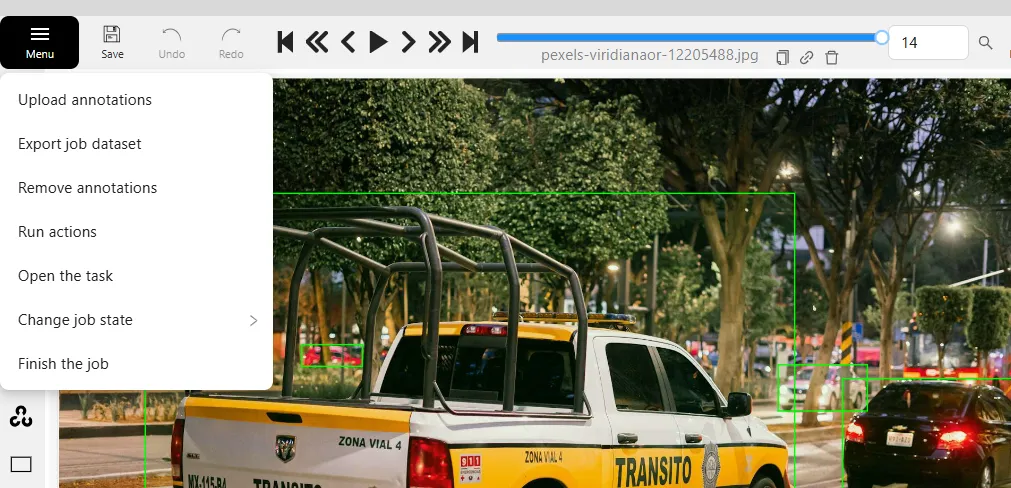
When finishing the annotation, the annotator should change the task status accordingly in the menu, then save and close the task.
The menu also contains other useful functions that assist with annotation or annotation management, such as Remove annotation and Run actions. However, these should be used carefully to avoid accidentally deleting or modifying annotations that do not require changes.
More details: Navigation bar & Menu | CVAT #Menu
Conclusion
CVAT is a powerful and flexible tool for annotating images and videos, supporting a wide range of workflows — from manual annotation to automated processes using artificial intelligence models. Its structured approach to organizing the workflow through projects, tasks, and jobs allows for efficient management of large volumes of data and the distribution of work among team members.
The CVAT interface is designed to provide annotators with convenient and functional tools for fast and high-quality annotation. The ability to customize keyboard shortcuts, different annotation modes, as well as easy navigation and progress tracking significantly enhance productivity and work quality.
Thus, a deep understanding of CVAT’s structure and skillful use of its features is the key to successfully completing annotation tasks, ultimately contributing to the creation of accurate and reliable datasets for training modern computer vision models.


.jpg)
.svg)
.png)

.png)


